http://www.soluto.com/

Thursday, May 26, 2011
Tuesday, May 24, 2011
The Beginner's Guide to Nano, the Linux Command-Line Text Editor

New to the Linux command-line? Confused by all of the other advanced text editors? How-To Geek’s got your back with this tutorial to Nano, a simple text-editor that’s very newbie-friendly.
When getting used to the command-line, Linux novices are often put off by other, more advanced text editors such as vim and emacs. While they are excellent programs, they do have a bit of a learning curve. Enter Nano, an easy-to-use text editor that proves itself versatile and simple. Nano is installed by default in Ubuntu and many other Linux distros and works well in conjunction with sudo, which is why we love it so much.
Running Nano

You can run nano in two ways. To open nano with an empty buffer, just type in “nano” at the command prompt.
You can also use the following syntax:
nano /path/to/filename
Nano will follow the path and open that file if it exists. If it does not exist, it’ll start a new buffer with that filename in that directory.
Let’s take a look at the default nano screen.

At the top, you’ll see the name of the program and version number, the name of the file you’re editing, and whether the file has been modified since it was last saved. If you have a new file that isn’t saved yet, you’ll see “New Buffer.” Next, you’ll see the contents of your document, a body of text. The third-line from the bottom is a “system message” line that displays information relevant to the program executing a function. Here, you can see that it says “New File.” Lastly, the final two rows at the bottom are what make this program very user-friendly: the shortcut lines.
It’s a WYSIWYG editor; “what you see is what you get.” What you type directly goes into the text input, unless you modify it with a key like Control or Meta. It’s pretty simple, so type some text out, or copy something and paste it into your terminal so we have something to play with.

Shortcuts
Program functions are referred to as “shortcuts” in nano, such as saving, quitting, justifying, etc. The most common ones are listed at the bottom of the screen, but there are many more that aren’t. Note that nano does not use the Shift key in shortcuts. All shortcuts use lowercase letters and unmodified number keys, so Ctrl+G is NOT Ctrl+Shift+G.
Hit Ctrl+G to bring up the Help documentation and scroll down to see a list of valid shortcuts.

When you’re done looking at the list, hit Ctrl+X to exit help.
Let’s say you’re working on a new text file, or “buffer,” and you want to save it. This is called “writing out” and is executed by hitting Ctrl+O. You’ll be prompted for a filename to use, and the shortcuts at the bottom will change to reflect what you can enter to complete this particular command.

If you want to insert the contents of another file into your current buffer, you’d type Ctrl+R.

You can cancel both of the previous commands by typing Ctrl+C.
You can hit Escape twice instead of holding down the Control key, if you have trouble doing that. There are also some commands that require use of the Meta key. On most keyboard layouts, Meta equates to the Alt button.
When you want to quit nano, you just hit Ctrl+X. Nano will politely ask you if you want to save your buffer, and you can cancel this action as well.

Navigation
Now that we’ve got a hang of shortcuts, let’s get used to moving around a text file very quickly. Of course, you can always use the Home, End, Page Up, Page Down, and the arrow keys to get around, but that requires moving your fingers from the letters that we all love so much.
To move the cursor forward or backward, you can type Ctrl+F and Ctrl+B. To move up and down one line at a time, you can type Ctrl+P and Ctrl+N. In other words, you can use those keys instead of the Right, Left, Up, and Down arrows, respectively. Missing the Home and End keys? You can use Ctrl+A and Ctrl+E. Want to move pages at a time instead? Ctrl+V moves down a page, and Ctrl+Y moves up a page.
But wait, there’s more! To move forward and backward one word at a time, you can use Ctrl+Space and Meta+Space (remember, that’s Alt+Space). And, if you’re really in a rush, you can hit Ctrl+_ and then type in the line number, a comma, and the column number to jump straight there.

If you want to see where your cursor currently is, sort of like nano-GPS, hit Ctrl+C.

Copying, Cutting, and Pasting
When we want to copy text in graphical environment, we highlight it with the cursor. Similarly, in nano we “mark” it by using the Ctrl+^ command. You simply move the cursor to where you want to start marking, and then you hit Ctrl+^ to “set” it. This will mark everything between the starting point up to and NOT including the cursor.

Note that the cursor is on the empty space, and copying/cutting will not include this space. You can also mark backwards from your “set” point. Be careful, however, as you can edit text while your marking. If you messed up, just hit Ctrl+^ again to unset the marker and you can start over.
To copy the marked text, hit Meta+^. If, instead, you want to cut the text, hit Ctrl+K.
To Paste your text, move the cursor to a suitable position and hit Ctrl+U.

If you want to remove an entire line of text, simply hit Ctrl+K without highlighting anything. This sometimes comes in handy when editing configuration files.
Some Extra Shortcuts
You know how in notepad, you can force long lines of text to wrap-around into what look like paragraphs? You can toggle that feature in nano with the Meta+L shortcut. Since line wrapping is set to “on” by default, this usually comes in handy in the opposite way; for example, you’re writing a config file and want to disable line-wrapping.

You can see that the line the cursor is on has a “$” at both the beginning and end. This signifies that there’s more text both before and after the portion being displayed on screen.
If you want to search for a text string, hit Ctrl+W, and enter your search term. This search can then be cancelled mid-execution by hitting Ctrl+C without destroying your buffer.

The previous search term appears in the square brackets, and leaving the line blank and hitting Enter will repeat that last search.
And after you get really comfortable, you can turn that helpful section at the bottom off by hitting Meta+X to get more screen space for editing!

Some History
Nano was designed to be similar in look and feel to another program called Pico. Pico was the default text editor of Pine, an email program from back in the day that wasn’t distributed with a GPL-friendly license. This meant that redistribution was somewhat of a fuzzy area, and so the TIP project was born. “TIP Isn’t Pico” added some functionality that Pico lacked and was licensed for free distribution, and over time, became the nano we love to use today. For more information, check out the Nano Project’s History section on their FAQ.
The strength of nano lies in its simplicity of use. The shortcuts work just like in GUI-based word processors like Word and Open Office, so it’s just a matter of learning which ones do what. Everything outside of that is just simple text-editing. Next time you have to edit stuff on the command-line, we hope that you’ll be more comfortable with it now that you’ve gotten familiar with nano.
Monday, May 23, 2011
How to Install Programs in Ubuntu in the Command-Line

Ubuntu has a lot of GUI-based methods for installing applications, but they take some time to search and find. Since the keyboard is usually faster than the mouse, managing your software via the command-line can be a real time-saver.
APT
Linux manages software through packages, individual units of software that contain user interfaces, modules, and libraries. Most applications link several co-dependent packages together, and still others allow you to choose which packages to install and which to leave out at your own discretion. This can get confusing, so there’s a package manager at your disposal to help
Each Linux distribution has its own package management system. For our own near and dear Ubuntu, it’s the Advanced Packaging Tool. It has a family of commands that allows you to add repositories; search for, install, and remove packages; and even simulate upgrades and such. The commands are fairly easy to remember and use, so you’ll be managing your system’s software in no time at all!
APT requires super-user permissions, as it deals with core aspects of the system, so in Ubuntu you’ll need to preface most commands with “sudo.”
Searching for Packages
The command to search for software is:
apt-cache search [search term 1] [search term 2] … [search term n]
Replace [search terms] but don’t use brackets. You’ll get an output like this:

You can search for terms in the description of packages, say for a solitaire game, or by package name. Some searches may yield a ton of results, so you can scroll through the list with the following command:
apt-cache search [search terms] | less
There’s a pipe in the middle of that command (it shares a key with \). The less command will allow you to scroll through your list with the arrow keys, page up/down keys, and space, b, and enter. Hit q to exit the list and go back to the prompt.
Adding Repositories
You can find more software in repositories found online. Take, for instance, Ubuntu Tweak, a program that lets you change some hidden or otherwise difficult-to-change settings for your system. It’s hosted at another repository. If you add the repository instead of downloading and installing just the package, the system will notify you of updates and automatically keep it up-to-date for you. You can manually add and change repositories by editing APT’s sources file:
sudo nano /etc/apt/sources.list
But Ubuntu 9.10 Karmic Koala changed that. There’s an easier way!

sudo add-apt-repository [repository name here]
Let’s look at Ubuntu Tweak’s repo to see what it’ll look like in practice:
sudo add-apt-repository ppa:tualatrix/ppa
Voila!
Updating Sources

After adding repositories, you have to update your package list.
sudo apt-get update
That will update the package lists from all repositories in one go. Remember to do this after every added repository!
Installation
Now that you’ve added your software repo and updated your package list, and found the package name you need, you can install it.
sudo apt-get install [package name 1] [package name 2] … [package name n]

This will download and install all of the packages listed. If there are dependencies – other prerequisite packages – they will also be installed. Sometimes you’ll also see a list of recommended but optional packages to go along with your selection. Sometimes, you’ll also see a confirmation prompt, though not always.
Often, you’ll see a core package with other linked packages, so installing this one will automatically install the dependencies and sometimes its associated packages, too.

Removing Packages
If you want to get rid of a program, you can uninstall its associated packages.
sudo apt-get remove [package name 1] [package name 2] … [package name n]

If you want to get rid of the configuration files and associated directories (usually in the user’s home directory), you’ll want to add the purge option:
sudo apt-get remove –purge [package name 1] [package name 2] … [package name n]
There are two dashes there. This will come in handy if a program isn’t working properly. By purging upon removal, you’ll can have a “clean” install.
Most of the time, you can just choose the core package and the associated ones will be removed as well. If it doesn’t, you can use the following command:
sudo apt-get autoremove
This will automatically remove any packages that aren’t used or associated with any installed program. For example, if you got rid of a core package, autoremove will get rid of it’s associated packages and any dependencies it had, so long as no other program is using them. It’s a great way to clean up any unused libraries and packages you don’t need.
Upgrading Software
So, what if your packages need upgrading? You can upgrade individual programs with the following command:
sudo apt-get upgrade [package name 1] [package name 2] … [package name n]
Or, you can upgrade all packages by having no further arguments:
sudo apt-get upgrade
This will tell you how many and which packages need updating and will ask for a confirmation before it continues.
Remember, you may need to update first. Upgrade will replace older versions of programs with their newer versions. This is a replacement process; the same package name is required and the older version is replaced with a newer version. No completely new packages are installed and no packages are uninstalled.
Some programs don’t quite work that way. They require a package with a slightly different name to be removed and a new one with a different name to be installed. Sometimes a program’s new version has a new required package. In these cases, you’ll need to use dist-upgrade.

sudo apt-get dist-upgrade [package name 1] [package name 2] … [package name n]
sudo apt-get dist-upgrade
Now, all of the dependencies will be satisfied no matter what. If you aren’t into micro-managing your packages, then this is the command you’re going to use.
If you only want to see which packages will be upgraded if you were to hypothetically run the command, you can simulate an upgrade with the –s option.
sudo apt-get –s upgrade
This is really useful if you aren’t sure if upgrading one package will mess up other programs, which happens occasionally with things like PHP and mail server libraries.
Cleaning
When you download packages, Ubuntu caches them in case it needs to refer to them further. You can delete this cache and get back some hard drive space with the following command:
sudo apt-get clean
If you want to get rid of your cache, but save the newest versions of what packages you have, then use this instead:
sudo apt-get autoclean
This will get rid of the older versions which are pretty much useless, but still leave you with a cache.
Checking What’s Installed
You can see a list of all your installed packages with dpkg.
sudo dpkg –list
You can also use less to scroll through this list.
sudo dpkg –list | less
You can also search through the list with the grep command.
dpkg –list | grep [search term]
If something is installed, you’ll see a package name and a description.
You can also search through a more compact method:
dpkg –l ‘search term’
That option is a lowercase letter L, and your search term must be inside single quotes. You can use wildcard characters to search better as well.

Easter Egg
APT has an interesting easter egg.
sudo apt-get moo
Enjoy your super cow powers!
Being able to manage packages and installed software via command-line can save you some time. Ubuntu’s Software Updater is often laggy on my system and it can really be a pain to have to add software repos and install packages through the Software Center, especially if you know the package names already. It’s also great for managing your system remotely via SSH. You don’t need to have a GUI running at all or deal with VNC.
There are a lot of things to learn when getting comfortable with the command-line, so you may want to check out The Beginner’s Guide to Nano, the Linux Command-Line Text Editor. There’s more to come!
Wednesday, May 18, 2011
HTG Explains: Cameras, Lenses, and How Photography Works

Confused by that digital SLR you have, and all the photography jargon that goes along with it? Take a look at some photography basics, learn how your camera works, and how that can help you take better pictures.
Photography has everything to do with the science of optics—how light reacts when it is refracted, bent, and captured by photosensitive materials, like photographic film or photosensors in modern digital cameras. Learn these basics of how a camera—practically any camera—works, so you can improve your photography, whether you're using an SLR, or a cellphone camera to get the job done.
Just What is a Camera?

Around 400BC to 300BC, ancient philosophers of more scientifically advanced cultures (such as China and Greece) were some of the first peoples to experiment with the camera obscura design for creating images. The idea is simple enough—set up a sufficiently dark room with only a tiny bit of light entering through a pinhole opposite a flat plane. The light travels in straight lines (this experiment was used to prove this), crosses at the pinhole, and create an image on the flat plane on the other side. The result is an upside-down version of the objects being beamed in from the opposite side of the pinhole—an incredible miracle, and an amazing scientific discovery for people that lived more than a millennium before the "middle ages."

To understand modern cameras, we can start with the camera obscura, leap forward a few thousand years, and begin talking about the first pinhole cameras. These use this same simple "pinprick" of light concept, and create an image on a plane of photosensitive material—an emulsified surface that reacts chemically when struck by light. Therefore the basic idea of any camera is to gather light, and record it on some kind of photosensitive object—film, in the case of older cameras, and photo sensors, in the case of digital ones.
Does Anything Go Faster Than the Speed of Light?

The question posed above is sort of a trick. We know from physics that the speed of light in a vacuum is a constant, a speed limit that is impossible to pass. However, light has a funny property, compared to other particles, like neutrinos that travel at such quick speeds—it doesn't go the same speed through every material. It slows, bends, or refracts, changing properties as it goes. The "speed of light" escaping from the center of a dense sun is agonizingly slow compared to the neutrinos that escape from them. Light may take millennia to escape a star's core, while neutrinos created by a star react with nearly nothing, and fly through the densest matter at 186,282 miles/sec, as if it was barely even there. "That's all well and good," you might ask, "but what does this have to do with my camera?"

It is this same property of light to react with matter that allows us to bend, refract, and focus it using modern photographic lenses. The same basic design hasn't changed in several years, and the same basic principles from when the first lenses were created apply now, as well.
Focal Length and Staying in Focus

While they have become more advanced throughout the years, lenses are basically simple objects—pieces of glass that refract light and direct it toward an image plane toward the back of the camera. Depending on how the glass in the lens is shaped, the amount of distance the crisscrossing light needs to converge properly on the image plane varies. Modern lenses are measured in milimeters and refer to this amount of distance between the lens and the convergence point on the image plane.
Focal length also affects the kind of image your camera captures, as well. A very short focal length will allow a photographer to capture a wider field of view, while a very long focal length (say, a telephoto lens) will cut the area you're imaging down to a much smaller window.
There are three basic types of lenses for standard SLR images. They are Normal lenses, Wide-angle lenses, and Telephoto lenses. Each of these, beyond what has already been discussed here, have some other caveats that come along with their use.

- Wide-angle lenses have huge, 60+ degree angles of view, and are usually used for focusing on object closer to the photographer. Objects in wide angle lenses may appear distorted, as well as misrepresenting the distances between distance objects and skewing perspective at closer distances.
- Normal lenses are those that most closely represent the "natural" imaging similar to what the human eye captures. Angle of view is smaller than Wide-angle lenses, without distortion of objects, distances between objects, and perspective.
- Long-focus lenses are the huge lenses you see photography aficionados lugging around, and are used to magnify objects at great distances. They have the most narrow angle of view, and are often used to create depth of field shots and shots where background images are blurred, leaving foreground objects are left sharp.
Depending on the format used for photography, focal lengths for Normal, Wide-Angle, and Long-Focus lenses changes. Most ordinary digital cameras use a format similar to the 35mm film cameras, so the focal lengths of modern DSLRs are very similar to the film cameras of yesteryear (and today, for the film photography buffs).
Aperture and Shutter Speeds
Since we know that light has a definite speed, only a finite amount of it is present when you take a photo, and only a fraction of that makes it through the lens to the photosensitive materials within. That amount of light is controlled by two of the major tools a photographer can adjust—the aperture and shutter speed.

The aperture of a camera is similar to the pupil of your eye. It is more or less a simple hole, that opens wide or closes down tightly to allow more or less light through the lens to the photo receptors. Bright, well-lit scenes need minimal light, so the aperture can be set to a larger number to allow less light through. Dimmer scenes require more light to strike the photo sensors in the camera, so the smaller number setting will allow more light through. Each setting, often referred to as f-number, f-stop, or stop, typically allows half the amount of light as the setting before it. Depth of field also changes with the f-number settings, increasing the smaller the aperture used in the photograph.

In addition to the aperture setting, the amount of time the shutter stays open (aka, shutter speed) to allow light to strike photosensitive materials can also be adjusted. Longer exposures allow in more light, particularly useful in dim lighting situations, but leaving the shutter open for extended periods of time can make huge differences in your photography. Movements as small as involuntary hand tremors can dramatically blur your images at slower shutter speeds, necessitating the use of a tripod or sturdy plane to place the camera on.

Used in tandem, slow shutter speeds can compensate for smaller settings in aperture, as well as large aperture openings compensating for very fast shutter speeds. Each combination can give a very different result—allowing lots of light in over time can create a very different image, compared to allowing lots of light in through a larger opening. The resulting combination of shutter speed and aperture creates an "exposure," or the total amount of light that strikes the photosensitive materials, be they sensors or film.
--
Thanks&Regards
sravanMonday, May 16, 2011
73 Essential Social Media & Tech Resources for Small Businesses


As a small business owner, your time is limited. Each week we put together a roundup of essential social media resources to help you stay on top.
We wanted to give you even more of a leg up with this megalist of our top small business resources from the past few months, including social media, tech, startups, marketing & advertising, dev & design and mobile posts that were written with small business in mind.
Of course, if you’re still hungry for more business resources, you can follow Mashable‘s business channel on Twitter and become a fan on Facebook. Happy reading!
Social Media

§ HOW TO: Poll Consumers on Facebook
We collected some simple ways to poll your consumers on Facebook, as well as a mini-list of best practices.
We collected some simple ways to poll your consumers on Facebook, as well as a mini-list of best practices.
§ HOW TO: Set Up a Foursquare Special
There are now seven types of specials available on Foursquare — here’s an explanation of each special, along with some tips to help you get started.
There are now seven types of specials available on Foursquare — here’s an explanation of each special, along with some tips to help you get started.
§ 10 Proven Strategies for Greater Likeability on Facebook
Here are 10 universal laws for brand likeability in social media.
Here are 10 universal laws for brand likeability in social media.
§ HOW TO: Get Your Employees On Board With Your Social Media Policy
It’s not an easy job to help people reconcile their public and private lives on social media, and it all comes down to training, mentorship, and establishing guidelines and best practices. Here are some tips.
It’s not an easy job to help people reconcile their public and private lives on social media, and it all comes down to training, mentorship, and establishing guidelines and best practices. Here are some tips.
§ 5 Best Practices for Travel & Tourism Brands on Facebook
Best practices for travel and tourism brands on Facebook — borrowed from the big players in the industry — that will help you attract gadling jetsetters and secure more reservations.
Best practices for travel and tourism brands on Facebook — borrowed from the big players in the industry — that will help you attract gadling jetsetters and secure more reservations.
§ HOW TO: Create a Group Tumblr Blog
Want to set up a company blog that contributors can post to from multiple accounts? Want to use a password-protected Tumblr internally? Here we show you how.
Want to set up a company blog that contributors can post to from multiple accounts? Want to use a password-protected Tumblr internally? Here we show you how.
§ 5 Tips for Closing a Sale on Facebook
How can you maximize the social network to close sales for your own business? Here are five tips to help you design a Facebook presence that makes buying your products more desirable and easy.
How can you maximize the social network to close sales for your own business? Here are five tips to help you design a Facebook presence that makes buying your products more desirable and easy.
§ 14 Best Practices for Long-Term Social Media Success
Following these best practices will prevent your brand from falling victim to the coming wave of customer unlikes and unfollows. But more importantly, focusing social channels and investing in the value of each will improve the customer experience and encourage greater engagement.
Following these best practices will prevent your brand from falling victim to the coming wave of customer unlikes and unfollows. But more importantly, focusing social channels and investing in the value of each will improve the customer experience and encourage greater engagement.
§ HOW TO: Start Marketing on Foursquare
The most recent iteration of the location-based app, Foursquare 3.0, expanded the features and made it much easier for businesses to jump on the bandwagon and start marketing. Get started here.
The most recent iteration of the location-based app, Foursquare 3.0, expanded the features and made it much easier for businesses to jump on the bandwagon and start marketing. Get started here.
§ HOW TO: Get Started With Photo Blogging
We consume so much content in our digital lives, it seems we’ve developed a need for it to be presented in the simplest, most efficient way possible. Enter: the photo blog.
We consume so much content in our digital lives, it seems we’ve developed a need for it to be presented in the simplest, most efficient way possible. Enter: the photo blog.
§ Social Media for Small Businesses: 6 Effective Strategies
Many small business owners are either too busy for social media, or they don’t truly understand Facebook, Foursquare or Twitter. So they choose to delegate these tools to interns or specialists. This may not always be in the best interest of the company.
Many small business owners are either too busy for social media, or they don’t truly understand Facebook, Foursquare or Twitter. So they choose to delegate these tools to interns or specialists. This may not always be in the best interest of the company.
§ How Tasti D-Lite Has Raised the Bar for Social Media Success
Frozen dessert shop Tasti D-Lite has been heating up the social space over the past few years, introducing a series of innovative digital programs and campaigns. We spoke with Chief Marketing Officer Bill Zinke to get a taste for what the company is up to lately and what digital and social projects it’s working on next.
Frozen dessert shop Tasti D-Lite has been heating up the social space over the past few years, introducing a series of innovative digital programs and campaigns. We spoke with Chief Marketing Officer Bill Zinke to get a taste for what the company is up to lately and what digital and social projects it’s working on next.
§ How Small Businesses Can Use Social Media for Customer Service [INTERVIEW]
Customer relationship management isn’t just the domain of big brands, and these days, more and more companies are offering free online tools to make it easier for SMBs to keep track of and reach out to their customers.
Customer relationship management isn’t just the domain of big brands, and these days, more and more companies are offering free online tools to make it easier for SMBs to keep track of and reach out to their customers.
§ HOW TO: Start Marketing With HootSuite
As social media increasingly becomes optimized for brands, marketers are finding themselves juggling multiple accounts across a variety of networks. With so many statuses to update and so little time, keeping yourself organized is key.
As social media increasingly becomes optimized for brands, marketers are finding themselves juggling multiple accounts across a variety of networks. With so many statuses to update and so little time, keeping yourself organized is key.
§ 5 YouTube Marketing Tips for Better Engagement
In addition to its incredible success as the de facto portal for video uploads and viewing, YouTube is itself a community. For brands, it provides an additional viable opportunities to spark discussion with followers. It’s a place to build relationships and create a space for users to converse with each other about branded content.
In addition to its incredible success as the de facto portal for video uploads and viewing, YouTube is itself a community. For brands, it provides an additional viable opportunities to spark discussion with followers. It’s a place to build relationships and create a space for users to converse with each other about branded content.
§ 5 Tips for Recruiting College Students via Social Media
More and more companies are recognizing the value of social media in building their employer brand in the minds of college students. From the Department of State (@DOScareers) to Google (@GoogleStudents) to MTV (@MTVNetworksJobs), organizations across many industries are taking to Facebook, LinkedIn, Twitter, YouTube and blogs to enhance their image and build a pipeline of talent from college campuses.
More and more companies are recognizing the value of social media in building their employer brand in the minds of college students. From the Department of State (@DOScareers) to Google (@GoogleStudents) to MTV (@MTVNetworksJobs), organizations across many industries are taking to Facebook, LinkedIn, Twitter, YouTube and blogs to enhance their image and build a pipeline of talent from college campuses.
§ HOW TO: Add Social Sharing Buttons to Your Website
For many sites, adding social sharing buttons is a simple and effective way to quickly boost pageviews and sharing stats. Unfortunately, it can also be a way to clutter up your pages, confuse your users, and cause massive bugs and layout issues. Here’s a quick guide to best practices for adding social sharing buttons to your site or blog.
For many sites, adding social sharing buttons is a simple and effective way to quickly boost pageviews and sharing stats. Unfortunately, it can also be a way to clutter up your pages, confuse your users, and cause massive bugs and layout issues. Here’s a quick guide to best practices for adding social sharing buttons to your site or blog.
§ Should You Outsource Your Social Media Efforts?
Hiring a social media consultant may not be as straightforward as hiring other types of professional service providers, such as a web designer or an accountant. Here are four questions to consider when deciding whether to outsource your social media.
Hiring a social media consultant may not be as straightforward as hiring other types of professional service providers, such as a web designer or an accountant. Here are four questions to consider when deciding whether to outsource your social media.
§ How The Pros Measure Social Media Marketing Success
The notion that marketing costs can’t always be understood is an ancient one. John Wanamaker, a department store mogul who died in 1922, once mused, “Half the money I spend on advertising is wasted; the trouble is I don’t know which half.” Here are some tips to help you figure it out.
The notion that marketing costs can’t always be understood is an ancient one. John Wanamaker, a department store mogul who died in 1922, once mused, “Half the money I spend on advertising is wasted; the trouble is I don’t know which half.” Here are some tips to help you figure it out.
§ HOW TO: Get the Most Out of Facebook and Twitter Promotions
As social media has worked its way into every aspect of our lives, we as a culture have come to expect that our favorite brands — from “Big Gay Ice Cream” trucks to national airlines and fashion houses — are easily accessible on the most popular social networks.
As social media has worked its way into every aspect of our lives, we as a culture have come to expect that our favorite brands — from “Big Gay Ice Cream” trucks to national airlines and fashion houses — are easily accessible on the most popular social networks.
§ 9 Digital Marketing Lessons From Top Social Brands
Big brands have already blazed trails in the digital marketing world. We spoke to social media and marketing experts at MTV, American Express, Xbox, NBA and AT&T to get the scoop on how they learned to hit the mark.
Big brands have already blazed trails in the digital marketing world. We spoke to social media and marketing experts at MTV, American Express, Xbox, NBA and AT&T to get the scoop on how they learned to hit the mark.
§ HOW TO: Use Facebook Social Plugins on Your Website
One of the easiest ways to make your online presence more social is by adding Facebook social plugins to your website. There are many different Facebook social plugins to choose from — here are four of the top plugins for business and tips on how and when to use them.
One of the easiest ways to make your online presence more social is by adding Facebook social plugins to your website. There are many different Facebook social plugins to choose from — here are four of the top plugins for business and tips on how and when to use them.
§ How Businesses Can Survive a Product Recall Using Social Media
These five tips will help companies maximize the potential of social media to protect consumers and their brands in the midst of any product recall situation.
These five tips will help companies maximize the potential of social media to protect consumers and their brands in the midst of any product recall situation.
§ HOW TO: Avoid and Prevent Facebook Spam
Facebook is doing a lot to help curb app-generated spam, with platform spam down 95% in 2010, but no automated system is perfect. Here are some tips to reduce the amount of spam that you see on Facebook — and avoid contributing to the problem yourself.
Facebook is doing a lot to help curb app-generated spam, with platform spam down 95% in 2010, but no automated system is perfect. Here are some tips to reduce the amount of spam that you see on Facebook — and avoid contributing to the problem yourself.
§ 6 Common Email Marketing Mistakes Small Businesses Make
For small businesses, email still represents a cheap, effective way to establish or maintain a relationship with clients. But the content has the power to either attract or repel — check out these tips before you hit “send.”
For small businesses, email still represents a cheap, effective way to establish or maintain a relationship with clients. But the content has the power to either attract or repel — check out these tips before you hit “send.”
§ HOW TO: Launch Any Product Using Social Media
Guy Kawasaki shares 12 things he did to launch his new book, including information about costs, vendors and analytics.
Guy Kawasaki shares 12 things he did to launch his new book, including information about costs, vendors and analytics.
§ 5 Excellent Small Business Blogs To Learn From
Here are five small businesses that are using a blog to reach local communities and showcase the company’s experience and expertise. We’ve outlined exactly what they’re doing right as a guide for other small businesses to improve their own blogging activities.
Here are five small businesses that are using a blog to reach local communities and showcase the company’s experience and expertise. We’ve outlined exactly what they’re doing right as a guide for other small businesses to improve their own blogging activities.
§ 10 Tips for Posting on Your Brand’s Facebook Page
Once your brand is on Facebook, the question becomes: How you engage those fans and sustain a meaningful online dialogue with your customers?
Once your brand is on Facebook, the question becomes: How you engage those fans and sustain a meaningful online dialogue with your customers?
§ Top 5 Mistakes to Avoid on Your Company Blog
Corporate websites are often little more than interactive brochures that display basic information and describe what the business offers. But if you’re looking to do more, then a company blog is a much better choice.
Corporate websites are often little more than interactive brochures that display basic information and describe what the business offers. But if you’re looking to do more, then a company blog is a much better choice.
§ 5 Tips for Maintaining Brand Consistency Across Social Media
As the recent foibles of Aflac, Chrysler and Kenneth Cole and others demonstrate, keeping an up-to-date, 24/7 presence on social media has its risks. A bigger risk though, is to ignore social media. So what is a brand to do?
As the recent foibles of Aflac, Chrysler and Kenneth Cole and others demonstrate, keeping an up-to-date, 24/7 presence on social media has its risks. A bigger risk though, is to ignore social media. So what is a brand to do?
§ The Pros and Cons Of Tumblr For Small Business
More and more businesses have been getting hip to social blogging platform Tumblr, which may have you wondering, “Should I be on Tumblr, too?”
More and more businesses have been getting hip to social blogging platform Tumblr, which may have you wondering, “Should I be on Tumblr, too?”
Bento Pad : Futuristic Modular Mobile Computing
| Bento Pad delivers an exceptional mobile computing experience. Bento is a cinematic tablet lets users enjoy content on the go. It employs modularity as an approach for sustainability and synergy. Measuring just 8mm thick, Bento Pad features a ten-inch wide cinematic radio OLED screen and approaches two dimensionality. Offering great grip and protection is a rubber gasket that runs around the perimeter. Another remarkable feature of Bento Pad is that of the kick stands that fold away smartly into the rear surface, providing an assortment of working angles and viewing angles. Perhaps, it acts as a Bluetooth wireless keyboard and even docks well into a laptop display. Designer : René Lee   In terms of its user interface, it appears to be quite intuitive and innovative with its home screen supporting various widgets. Just expand the dock and there is it, the Springboard is launched. Elegant touch screen controls are notable assets that add more significance to Bento Pad. The mobile keyboard is quite ergonomic and leaves an ample amount of space for apps. Its dynamic screen makes it rather simple to input languages as well as symbols. The user can just dock Bento Pad into an innovative Bento Book in a matter of minutes. In total, Bento Pad is not a mere replacement for a PC. Instead, it makes the portable computer even more better. 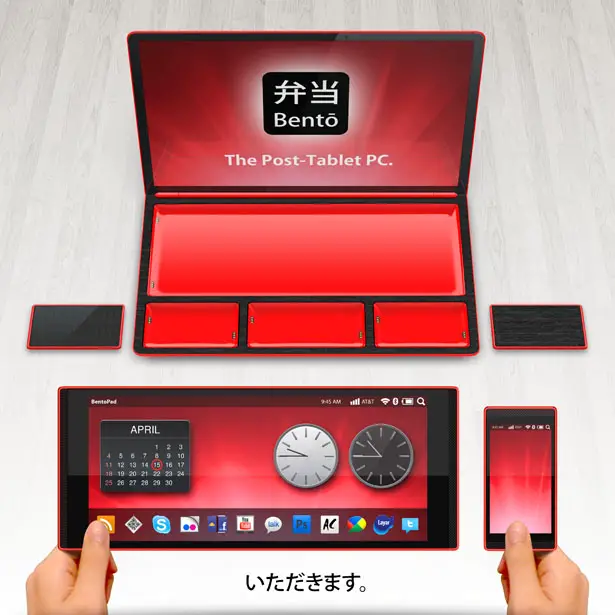 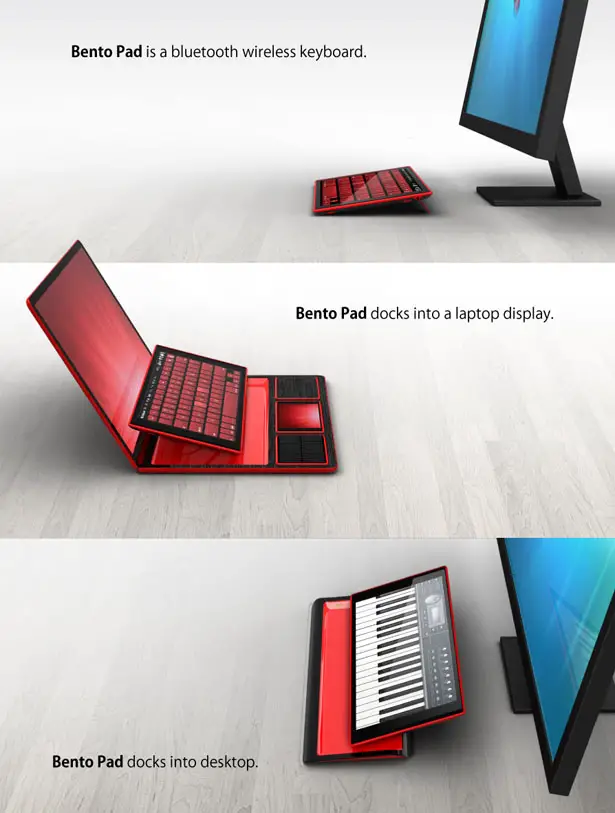 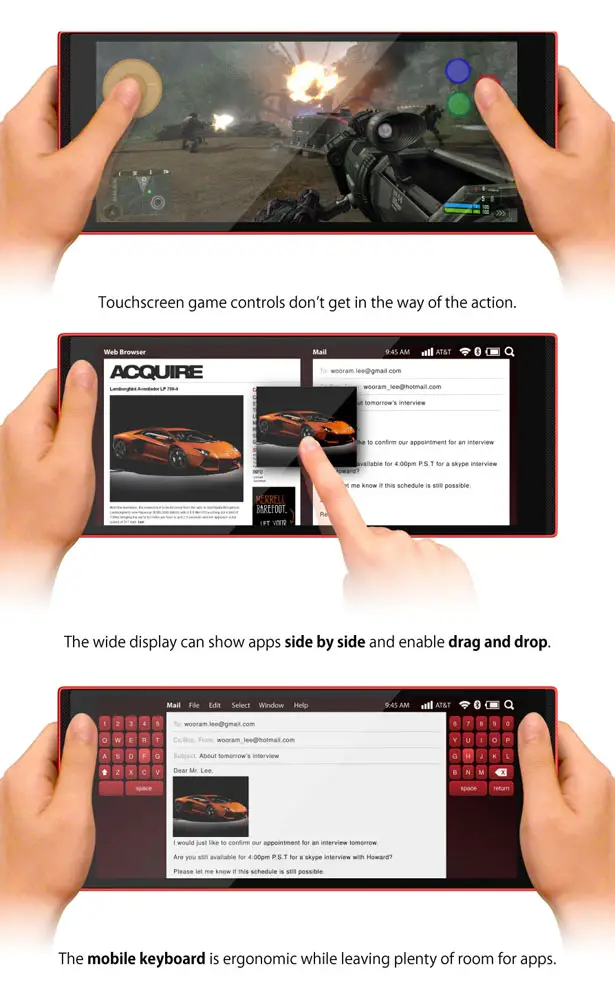 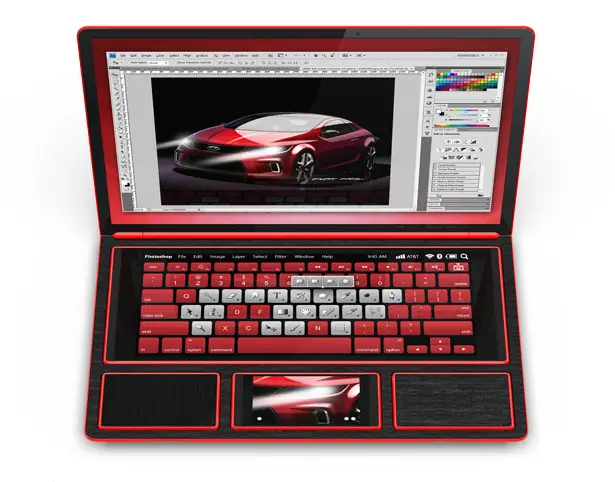  |
Subscribe to:
Posts (Atom)