 Rick Chin is the director of product innovation at SolidWorks, where he develops new products and researches how technology will make us smarter, simplify daily tasks and seamlessly fit into our everyday lives.
In 20 years our technology will reach a level of personalization
that will enhance every moment of our lives. We’ll be more physically
comfortable with the furniture we sit on and the products we hold; only the
most relevant and personalized information from friends and family will reach
us; and our movement in the digital world will be near telepathic.
I foresee several of today’s technologies as relevant to this
particular vision of the future. They will evolve to not only be more
powerful, but also more integrated with one other.
1. Smartphones
Smartphones, like today’s iPhone, are as much a computer as they
are a communication device. Besides having a great multi-touch interface and
fast CPU, they contain sensors like cameras, gyros, accelerometers, GPS and
compasses. They allow us to calculate and communicate anytime, anywhere.
In the future, they’ll evolve into personal mobile computers
(PMC). Assuming that Moore’s law
holds true, mobile CPUs with near super-computing speeds will be entirely
possible. The number, accuracy and performance of sensors will grow, the
combination of which will give the user a very powerful sense of her
surroundings.
Your PMC will move to your wrist and take the place of your
watch. (Microsoft had this vision with SPOT, but the technology came too early
and was too limited.) The device’s display will not need to be your primary
user interface (UI), so the PMC can be a small, diverse fashion statement
like today’s watches. The primary UI will become personal peripherals, like
information glasses and headsets. You’ll be able to interact naturally in a
visual and audible way.
Your PMC and personal peripherals will become your interface to
every other computer, device and machine you interact with. The only UI you
will ever need to know is that of your PMC.
Not only will your personal peripherals allow you to explicitly
interact with the digital (and physical) worlds, but they’ll also provide
subtle cues to your subconscious. While looking through your information
glasses, a restaurant might emit a subtle, warm blue tint because it was
reviewed positively by patrons. It will feel like a good place to
eat. Are your spidey senses tingling?
2. 3G and 4G Wireless Broadband
“How many bars do I have?” We’re frequently checking smartphone
signal strength when wirelessly browsing the Internet and retrieving our
email. Today’s 3G and 4G networks provide acceptable but intermittent
connections and okay speed. This must change.
The deployment of today’s cell towers is a slow, deliberate and
costly affair. In the future, deployment will be faster and more organic.
Wireless providers will likely credit homeowners’ monthly bills for having
devices like AT&T’s 3G MicroCell at home. With
enough of these devices in place, even remote neighborhoods and towns will
enjoy solid wireless access to the cloud.
So in the future, personal mobile computers (PMCs) won’t even
have signal strength indicators; wireless access to the cloud will be
pervasive and ultra-fast at all times.
3. Cloud Computing
There is certainly a lot of hype around cloud computing, but few
technology providers have done a good job explaining or providing services
that are relevant to the average person.
The two most notable exceptions are Google and Apple. Google Docs
is arguably the first cloud-based app that gained mainstream traction.
Apple’s iCloud
looks like it has the potential to cross the
chasm and move the early majority into the cloud.
With tomorrow’s cloud computing, all of our personal information
and the applications will be available to us at any time. Whether you’re
editing a text document while riding a train, or adjusting a sales proposal
at a client’s office, you’ll never be without the information needed to
complete a task.
4. Eye-Tracking / Voice Commands
Today’s eye-tracking technology from companies like Tobii is used
heavily in usability research. Where are people looking on a webpage, and how
do their eyes move around it? Voice recognition products like Dragon from Nuance are used extensively
when transcribing voice to text.
In the future, this technology will be combined with augmented
reality (AR) to create a near-invisible and natural user interface for your
PMC. We’ll call these information glasses. The object you’re viewing and the
words you speak will be transmitted to your PMC, which will interpret your
intent, find and compute and then transmit the results back to you visually
and/or verbally. Look at a restaurant and say, “Do they have good salads
there?” A moment later, you will hear the highest-rated salads, communicated
via your information glasses either by visual display or audible voice,
depending on what you are doing at that moment, like driving.
5. Augmented Reality
Today’s augmented reality (AR) will add floating text, symbols
and 3D virtual images to a camera’s video feed to make it more informative or
entertaining. Numerous iPhone apps like Layar provide local information. Tissot watches
and Olympus
cameras have webpages that let you experience virtual
products. And Lego has a great point of sale display
that lets kids virtually play with the toy inside the box they’re holding.
You can even use AR glasses to experience this technology
in a slightly more immersive, first-person point of view.
In the future, AR glasses will project images onto the lenses
using components that are barely noticeable. Your PMC will display
information on your glasses much like a heads-up display (HUD), for instance,
with symbols projected along the periphery. Look at a symbol and say something,
and your PMC will act on the broadcasted message. Your PMC will also do a
great job of minimizing the information displayed, limiting it to just what
you need to know now.
6. Social Networking
Social networking as it exists today on Facebook and Twitter requires
users to do extra work to extract value. We must diligently manage our
community of friends and followers, and weed through all the tweets and posts
for those that pique our interest. In the future, the management of our
network will be dynamic and automated; the system will make and break
connections to ensure maximum value. As updates are posted, for example, only
those relevant to you at the present moment will make it through the filter
to your PMC.
Social networking may also become more integrated with other
components of our digital lives, like our calendars, address books and GPS.
When going to a scheduled meeting with someone, you may be presented with
recent and relevant posts that person made on Facebook to help prepare for
small talk.
Image courtesy of Flickr, escapedtowisconsin
7. CAD, 3D Printing & Custom Products
Computer-aided design (CAD) products are popular among
engineers, designers and students for creating 3D product designs. But the
software is often too advanced for the average consumer to design his or her
own products.
In the future, however, CAD will allow the average consumer to
design his own custom products that are both manufacturable and affordable.
Consumers will be able to use simple software to combine predefined,
configured product features. They’ll be able to personalize further by adding
their own color palate, pictures, shapes and even personalized sizing.
3D Printing
(3DP), like that from Dimension,
is another amazing technology that will take a 3D CAD model and “print”
layers of material, one on top of the previous, to produce a real physical
model. It can create almost any shape, even those that can’t be made by
traditional manufacturing. The downside today is that the process is slow,
costly, and often doesn’t produce parts strong enough for real world use. The
technology in this industry is always advancing, and in the future, it will
be able to produce robust parts quickly and cheaply.
3D Printing in an industrial setting is often referred to as
“additive manufacturing.” As products are ordered online, versatile
manufacturing stations controlled by robots will quickly and affordably crank
out custom-manufactured products. The robots will be controlled by process
software that will be integrated with future CAD.
Online custom products are slowly gaining popularity. You can go
to NIKEiD
and design your own customized Nike shoes. The downside is that they are
pricey and will take several weeks to get to you. Other websites such as ShapeWays and Ponoko are useful
for many DIYers. The mass market appeal of sites like these will grow in the
future (when combined with the simpler CAD described above) with fast,
flexible and inexpensive manufacturing.
8. Autonomous Cars
Today’s cars are packed with a variety of driver assistance
aids. You can get most any car today with GPS, but luxury car makers such as
Audi, BMW, Mercedes and Volvo provide a whole lot more. Options now include
active cruise control, lane departure warning/intervention, traffic info and
blind spot warning. These cars can even brake on their own to avoid hitting
an obstacle or pedestrian in front of the vehicle.
A few years ago, DARPA
ran its Grand Challenge, in which teams competed
to race fully autonomous cars that drove themselves. They were tested in
off-road, highway and urban settings. Some of these competitors later went to
work for Google’s
autonomous vehicle efforts.
In the future, we will have autonomous cars, where driver
control will be optional. Even though the thought might seem scary, the cars
will be safer than any car you’d pilot yourself. They will constantly
evaluate their current environment with multiple sensors -- and they’ll never
get distracted by text messages.
Will they be complex to operate? Not at all. Your PMC will act
as a user interface to any device, including your autonomous car. It will
know your schedule and address book, so when you get into your car one hour
before an appointment, the car’s GPS will instantly display the destination
address and arrival time. All you have to do is say, “Let’s go!”
 |

Thursday, September 22, 2011
8 Current Technologies That Will Shape Our Future


How To Monitor and Log Your Bandwidth Usage with Tomato

Enforcement of broadband caps is on the rise. Whether you’ve received a warning letter from your ISP or you just curious and want to keep an eye on things, this tutorial will show you how you can monitor, log, and save your bandwidth usage with Tomato.
What You’ll Need
For this tutorial you’ll need the following things:- A router running the aftermarket firmware, Tomato.
- A computer to access the Tomato web-based GUI from.
- A network share if you wish to save your logs off the router (recommended).
Enabling Bandwidth Monitoring

The very first order of business is turning on the monitoring functionality in Tomato. Visit your router’s GUI (typically available from within your LAN at 192.168.1.1) and navigate to Administration –> Bandwidth Monitoring. Check the box next to Enable.
Beneath the Enable box you’ll find a set of options including save history location, save frequency, and the designation of the first day of the month.
Let’s take a look at the Save History Location. For those interested in storing logs long term there are several options in the Saving History Location pull down menu. For most routers you should see RAM (temporary), NVRAM, JFFS2, CIFS1, CIFS2, and Custom Path. What are these things and what are the positives and negatives to using them?

RAM (temporary): The positive to using the RAM is that it’s quick and you don’t have to configure anything. The downside is that you lose all your data when the router shuts down or crashes. As the log gets too big the tail end of the log is cut off.
NVRAM: The Non-volatile Random-Access Memory aboard the router. This is simply RAM that retains the data when the power is off. It’s marginally better than plain old RAM because of this feature but not by much. You get the benefit of the RAM with a lowered risk of data loss.
JFFS2: The Journaling Flash File System is a portion of NVRAM specifically formatted for file writing. It’s still not very big but for month-by-month logging it should be adequate.The problem with both the NVRAM/JFFS2 is that neither system was designed for frequent writing. There’s no sense prematurely wearing out a component in your router when there are alternatives, like CIFS.
CIFS 1/2: Tomato has a small CIFS (Common Internet File System) client built in. Essentially this allows Tomato to access a Samba/Windows Share share and mount it like a drive. If you want to archive your logs without worrying about running out of space this is your best option. It requires minimal configuration which we’ll delve into in the next section.
Custom Path: This simply allows you to create a custom directory within the JFFS2 for your log files. Not really necessary unless you’re actively using the JFFS2 for something and you’d really like a custom directory to keep things neat and tidy.
As for the other settings you’ll find in the Bandwidth Monitoring:
Save Frequency: Denotes how often Tomato will save the logs. If you’re using the RAM this setting doesn’t really matter. If you’re using any of the storage options like JFFS2/CIFS, this allows you to set how often the logs are saved. The higher your save frequency the less chance you’ll lose data because of a power out or some other router interruption.
Save On Shutdown: Just like it sounds, if you (or an application) sends the shut down signal to Tomato it will save the logs first.
Create New File: Wipes your current file and creates a new one. Sometimes when you switch save locations (such as moving from RAM to CIFS) it is necessary to create a new file in order for the new files to save properly.
Create Backups: Again, just like it sounds. Will generate backup reports in your specified download directory. In addition to the regular log saves you’ll have matching files with a .BAK extension.
First Day of the Month: The default of 1 should be fine unless your ISP logs from the middle of the month or something odd like that.
If you’ve opted to store your files on a network share via CIFS (and we highly recommend you do) you’ll need to set up the CIFS client before you go any further.
Enabling Tomato’s CIFS Client

In order to save to a network share you need to enable the CIFS client. Navigate to Administration – > CIFS Client.
From within the CIFS client menu check the Enable box under /cifs 1. Fill in the following information:
UNC: The IP address of your network share source and the directory, i.e. \\192.168.1.120\RouterLogs—do not use the name of the source on the network, use the IP.
Username/Password: You can use an existing account that has access to the network share or create a new account (on the host machine) just for the router to use. Either way you need a login and a password. Some people report success using the Guest account and just putting in a string of random key presses for the password (the CIFS client insists on there being a password in the password slot). The official Tomato documentation recommends against this.
Domain: Can usually be left blank; if computer is on an actual Domain it may need to be filled in with the appropriate domain name.
Execute When Mounted: This allows you to execute scripts on the router’s Linux OS when a remote drive is mounted. For our purposes leave it blank.
When you’ve filled in all your information click Save at the bottom. It should take a moment or two to mount (perhaps even upwards of 5 minutes) but then you should see the drive data listed in the Total / Free Size slot. If it fails to mount double check your password, make sure that the account you’re using has access to that directory (and can write to it), and, if you run into a wall, create a whole new share directory. We had an issue with Windows Home Server not wanting to grant access to a directory that was already part of the WHS share structure (the //Server/Public/ folder) so we made a brand new root share //Server/RouterLogs and all our CIFS creation woes vanished.
Once you’ve created the CIFS and it has been successfully mounted, go back to the Bandwidth Monitoring section and change the save location to CIFS 1.
Real Time Monitoring with Tomato

Now that we have the logging and the saving of those logs on lock down, let’s take a look at how you can use Tomato to monitor your bandwidth in real time and quickly look back over how much data you’ve used in the previous day, week, and month.
Navigate to Bandwidth in the left hand menu within the Tomato GUI. The default view is real time and should look like the screenshot above. You can look at all the traffic at once or you can look at just a slice of it by clicking the tabs along the top of the graph. Here’s what those tabs represent:
WAN (vlan1): This is the traffic coming into and going out of the WAN/Broadband port on your router. If your router is hooked directly to your data modem this is the best way to see exactly how much you’re downloading and uploading.
WL (eth1): This is your Wi-Fi traffic. Here you can see all the data activity happening inside your network on the Wi-Fi band. Generally you’ll only check this out if you’re trying to trouble shoot a Wi-FI device or if you suspect somebody is using your Wi-Fi.
br0: This is the bridge connection between the WAN and LAN ports. Watching this shows you the total traffic over the router including the Wi-Fi traffic, hardwire Ethernet connections, and out to the greater internet. This tab offers such sweeping view it’s hard to take in.
eth0: This tab shows all the hardwire traffic which includes the local ports and the WAN port with the internet traffic.
vlan0: Not actually a LAN, as it were, despite the “lan” portion of the name. Shows the hardwired ports, internet traffic, and internal traffic. If you want to see both the internet traffic (the data you’re uploading and downloading) as well as the data being moved around the internal network at the same time, use this view. It’s handy for seeing both that a large volume of data is coming in and where it’s going.

The above diagram highlights the internal setup and naming structure for a line of popular Linksys routers and should help you better visualize what is going on with each monitoring tab.
In addition to real-time monitoring you can also look at the prior day, week, and month. These views are much less colorful and simply give you the numbers in your preferred scale (KB, MB, or GB).
Now that we’re finished with the tutorial we’ve got a router that actively logs our bandwidth consumption, displays our usage in real time, and archives the logs to a network share for backup and further analysis. Have a question or a router trick? Let’s hear about it in the comments.
Wednesday, September 21, 2011
How to Dual-Boot Windows 7 and Windows 8 On the Same PC

If you want to try out the new Windows 8 but don’t have a CPU that supports virtualization, check out our guide on how to get all the goodness of Windows 8 along side Windows 7 by dual booting.
The scenario: you are in a situation where you have Windows 7 installed and you really want to try out Windows 8, but your PC does not support virtualization and you don’t want to have to format since Windows 8 is still in pre-beta and the chances are that there are some things that are broken. The only option you have here is to dual boot. The only thing that is required in order to dual boot is a hard drive with at least 20 Gigs of free space, it will work with a bit less but this is the minimum we recommend.
Dual Booting Windows 7 and Windows 8
To get started we need to logically separate those 20 Gigs from the space that Windows 7 is currently using, to do this we need to create a new partition. You can do this in the disk management MMC snap-in, to launch the snap-in press the Windows Key + R to launch a run box, type “diskmgmt.msc” into the run box.
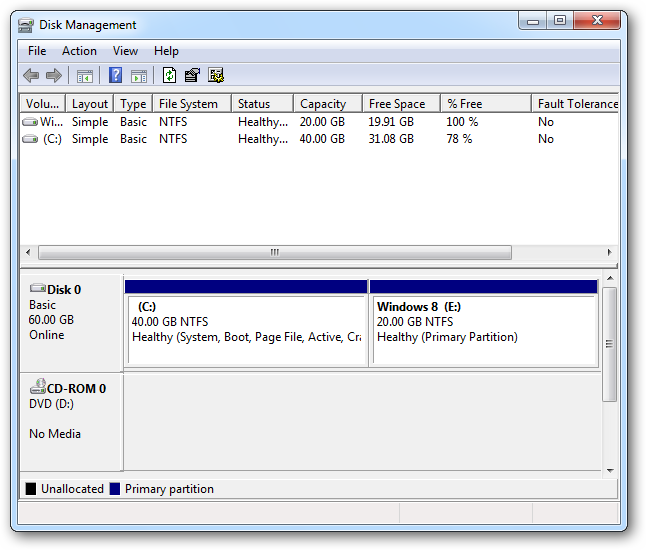
Once you press enter or click the ok button, a MMC will load with the disk management snap-in pre-loaded. From here you can get a nice overview of your hard drives.

You are now going to need to shrink the C: drive by the capacity that you wish your Windows 8 drive should be. To shrink the drive right click on the C: drive and select “shrink volume”

A dialog box will appear asking you how much you want to shrink the drive by. It asks you how much you would like to shrink in megabytes, so remember that there is 1024 megabytes in a gig so in our example we shrink 20 gigs which is20480 megabytes because 20*1024=20480.
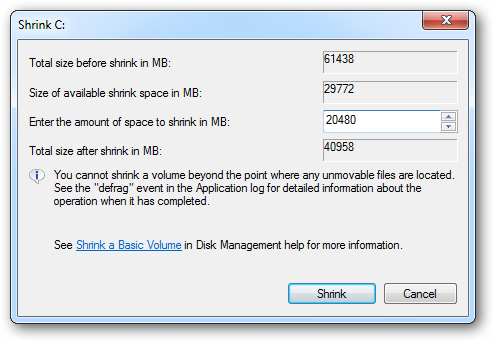
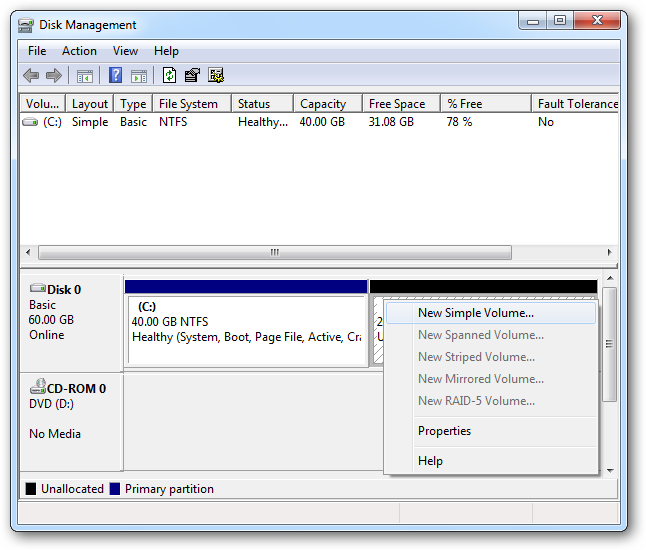
Once you click the shrink button Windows will shrink your drive. Once it has completed shrinking your partition, the Disk Manager will display this new space with a black header meaning it is an empty partition, you now need to give it a file system. To format the drive with a file system right click on the black space and select “New Simple Volume”.
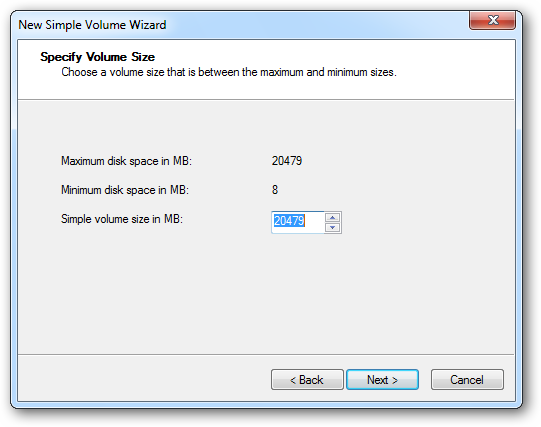
A wizard will launch this is going to take us through all the steps we need to format the drive. On the welcome screen you can just select next to be asked how much of the unallocated space you want to use, we recommend you leave the default which will use all the space you set aside if you alter this it may result in some space going to waste.
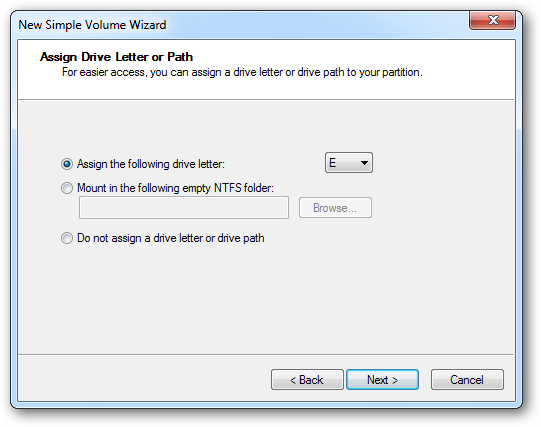
In the next dialog it asks you to assign it a drive letter, you can accept the defaults and click next.
On the format partition step of the wizard you can leave everything at defaults accept for the Volume Label which you should change to something memorable for example “Windows 8” this is important as this is the partition you will have to select at install time.

Click next and finish to initiate the format. Once the format is finished the once black header will now be blue and you are ready to install Windows 8.
Installation
If you haven’t yet downloaded a copy of the Windows 8 Developers Preview you should head over here and grab yourself a copy. Once you have either burned the ISO to a DVD or used the USB Download Tool to make a bootable USB you are ready to go, simply insert you DVD or plug in your USB and boot from the device. You might have to into the BIOS and change the boot order but since you dual booting pre-beta software we’ll assume you capable of that much. If you see the words “press any key to boot from CD or DVD” quickly press any key on your keyboard to begin configuring the installation.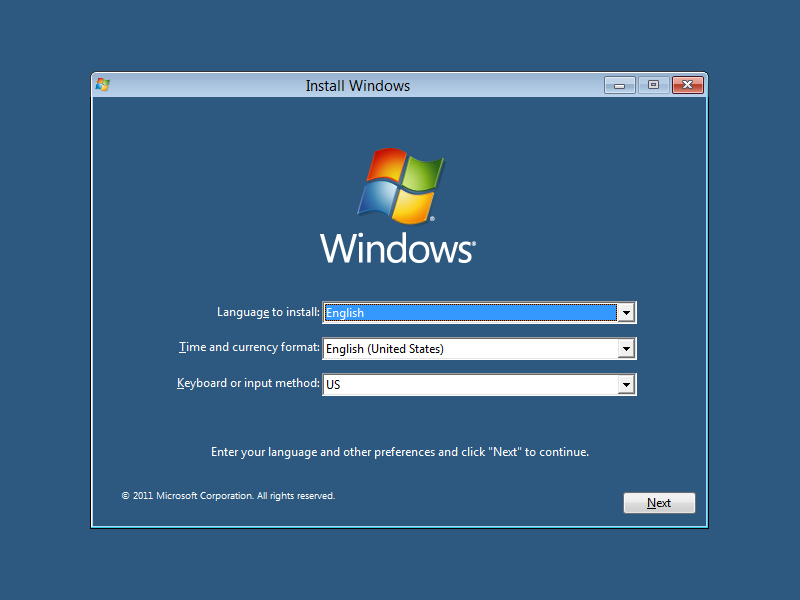
Once you have selected your languages the your are ready to install Windows 8. So click the install button to get started.


After setup has completed you will be asked to accept the license agreement, after you have read it, fill the check box and click next to move on to the installation type. You should choose the custom installation option.
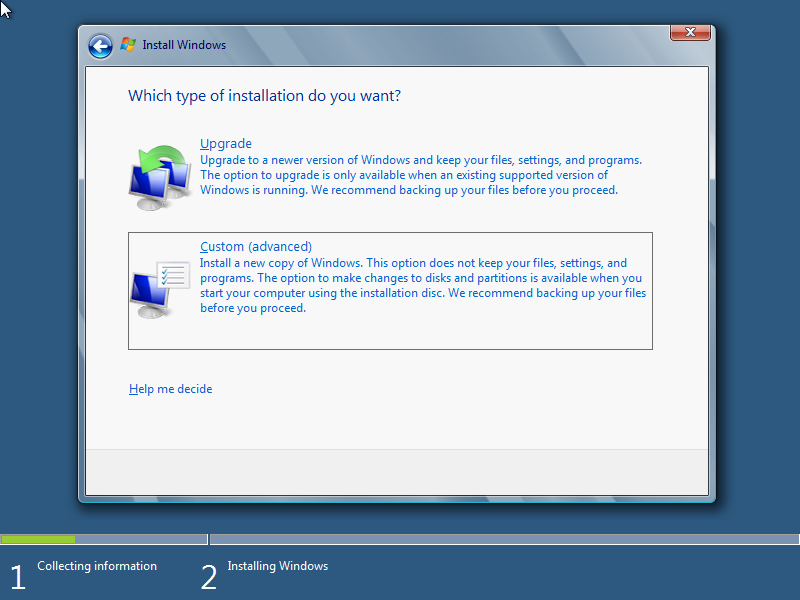
The next decision you will have to make is a critical one. Choosing the wrong partition to install on will result in data loss so make sure to choose the one that we created earlier.
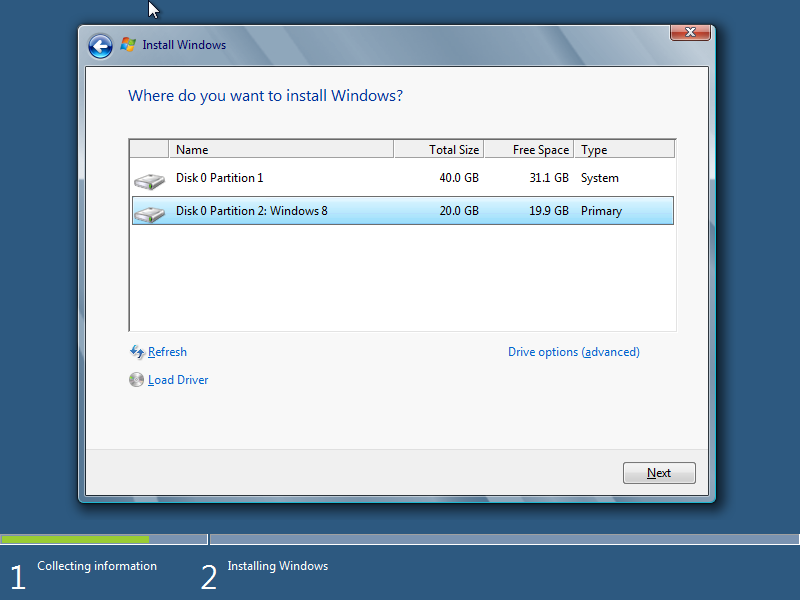
Once you have selected the partition and clicked next. The installation will start.

Once the installation in complete you will be asked to give your PC a name, then click on the next button.

The settings page that you will see next has two options, Use express settings and Customize, we’ll choose use express settings but feel free to choose custom option and specify your own settings.

The next decision you will have to make is whether you want to log into your computer using a Windows Live ID, or create a local account. We want a local account so we’ll click the link that says Don’t want to log in with a Windows Live ID.

Then we’ll choose local account on the next page.

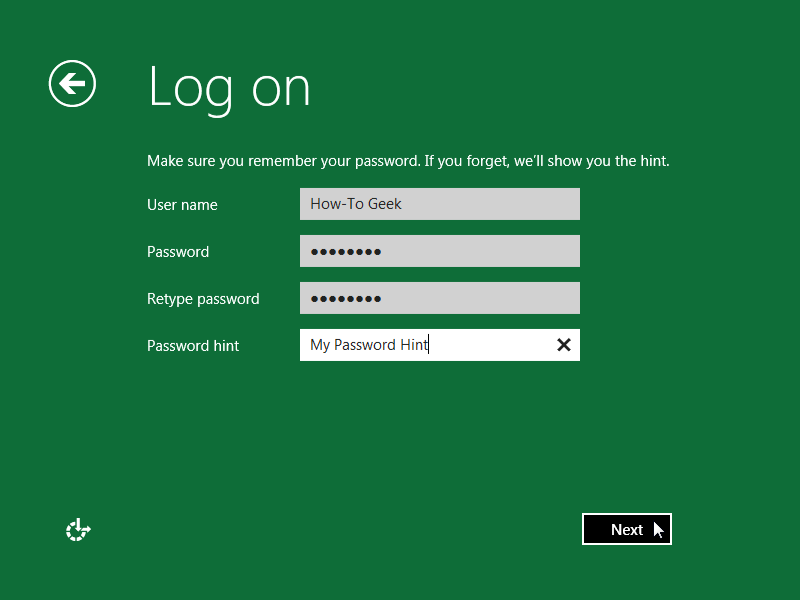
Type the name that you want to use as a log on name, also choose a strong password and a hint just incase your forget your password. When you done click next, your account will be created and you will be logged in.
Once it has logged you in you can restart your PC to see the new OS Selection screen. By default it will boot into Windows 8 after 30 seconds of inactivity, you probably don’t want this. To change the default back to Windows 7 click the Change defaults or choose other options link at the bottom of the screen.

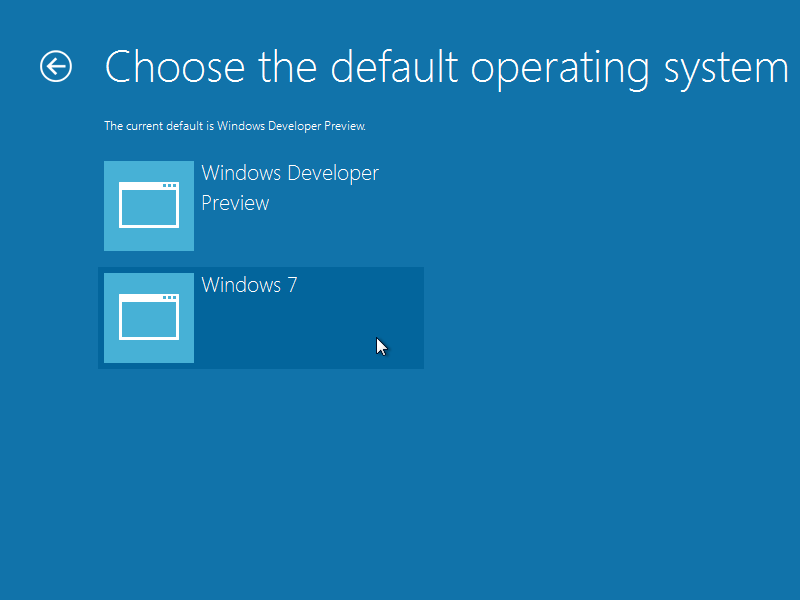
Now choose the change default operating system link.

And finally select Windows 7.
That’s all you have to do to reap the benefits of both worlds. To get started with Windows 8, you should probably check out our guide to all the new awesomeness it brings.
Subscribe to:
Posts (Atom)