Showing posts with label What It is. Show all posts

Sunday, December 18, 2011

How to Cancel or Delete a Stuck Print Job in the Windows Print Queue


image
If you tried to print, but the job just got stuck in the queue without being able to cancel it, you’re experiencing a stuck print job. There’s a simple way to clear out the print queue, but it’s not always the most obvious thing. Here’s how to do it.
Note: we encountered this problem earlier today but forgot to take a screenshot of the print queue with a stuck job, so we substituted with a picture of a regular job sitting in the queue.

Clearing a Stuck Print Job in Windows

The first thing you’re going to want to do is open up Services through the start menu search, find Print Spooler in the list, and click the Stop button.

Now open up Windows Explorer and put this into the location bar:
%windir%\System32\spool\PRINTERS
You might be prompted for UAC to allow access to the folder, which you’ll want to accept. Now you’ll see a bunch of files in the folder, and you’re going to want to delete all of them. Don’t delete the PRINTERS folder itself, just the files.

Now go back to Services and click the Start button to start up the service again.

At this point your stuck print job should be gone.

Monday, December 12, 2011

What Was the First Computer Virus?

Answer: The Creeper Virus
While the technical definitions for computer virus, worm, and malware might have a little overlap, it’s generally accepted that the first type of computer “virus” occurred in 1971 on ARPANET, the scientific/military network that preceded the modern internet. Creeper was an experimental self-replicating program that infected DEC computers across the network — this would be considered a computer worm today.
Written by Bob Thomas at the BBN Technologies lab, Creeper propagated itself throughout ARPANET by exploiting a vulnerability in DEC PDP-10 computers running the TENEX operating system. The worm wasn’t malicious and, upon gaining access to a machine and replicating itself, broadcast “I’m the creeper, catch me if you can!” on the terminal screen. The first virus removal program, dubbed The Reaper, soon followed, designed to ferret out Creeper infections.
Note: the term “computer virus” usually means a computer program that can replicate itself and spread from one computer to another. In modern terms, this is usually done by infecting a file, so a worm is not necessarily a virus. The term computer virus is also used in a more broad sense to describe malware, so the Creeper Virus is still a valid choice for the first virus — plus, it was created 10 years before the next viruses (Elk Cloner and Brain), making it a big milestone.

Wednesday, December 7, 2011

How to Dual Boot Windows 8 and Linux Mint on the Same PC


sshot-19
If you’re a serious operating system geek, you might want to test out both Windows 8 and Linux Mint. Here’s how to get the best of both by dual-booting Linux Mint with your Windows 8 installation.
Before we start there is a couple of things that you are going to need:
  • 10GB of free space on your drive
  • The Linux Mint DVD, from here (x86) or here (x64), burnt to a DVD.
  • About 30 Minutes of free time
Note: There are a lot of ways to do this, and since there is no one correct way to dual booting Windows and Linux, we are going to take the easiest method to help those new to Linux, while getting the full experience of installing a Linux OS.
So lets get started–since we are dual-booting Mint alongside your already existing Windows 8 installation, the first thing we need to do is boot up Windows and create an empty partition for the Mint installation. The easiest way to do this is to press the Windows + R key combination and type diskmgmt.msc into the run box and hit enter, but you could search for Disk Management in the Start Menu as well.

When the Disk Management MMC console opens up right click on your drive containing Windows 8 and select Shrink Volume… from the context menu.

You will now need to enter how many megabytes you would like to shrink the partition by, we recommend a minimum of 10GB. Remember that there is 1024MB in a gigabyte, so multiply the number of gigabytes that you want your new partition to be by 1024.

Now insert your Mint DVD and boot your PC from the DVD drive, this will normally require a pushing of a key at the POST screen–every motherboard is different but it will normally be F11 or F12.

The DVD should automatically boot into its Live mode, however if you bump a key and are prompted simply choose to start it.

Once booted, you can start the installation by double clicking on the Install Linux Mint shortcut on the desktop.

You can click continue until you get to the installation type section, here you will need to change the radio button to the something else option.

Once you have clicked on the continue button you will now have to pick a place to install Mint, scroll down until you see a partition called “free space”.

Double click on it to bring up the format menu, here accept all the defaults except for the mount point, where you should enter a single forward slash, then click ok.

Now you can click on the install now button.

A very nice touch to the installation process is that it starts asking for a few configuration settings while the OS is busy installing.

You will need to reboot your PC when the installation is finished, as you can see we can now easily choose our OS at startup.
Note: Grub picks up our Windows 8 installation, the entry at the bottom, as Windows Recovery Environment, this is actually your Windows 8 installation and the display name can easily be changed by selecting it from the menu and hitting the “e” key, this is mainly for advanced users.

Your default OS will now be Linux Mint, but you always have the choice of switching back to Windows 8 from the Grub boot menu at any time.

Monday, December 5, 2011

Email: What’s the Difference Between POP3, IMAP, and Exchange?


emailphone
We send a lot of email these days—at work, at home, on our phones… But do you know what all the email jargon means? Keep reading to find out more about the difference between the various ways to receive email.
Whether you use Gmail, Hotmail, Yahoo mail, or email configured on your own website—there’s more to receiving email that it might seem like on the surface. Today, we’ll be focusing on some answering some of the most common stumbling blocks when it comes to setting up new email accounts, and explaining the difference in clear language. For our geekier readers that already know that stuff, feel free to join in the discussion—let us know how you explain to relatives and tech-challenged coworkers the difference in common email setups… or simply share this guide and save yourself the trouble of explaining it!

Email Clients vs Webmail


Before we explain the different protocols used to download emails, let’s take a few minutes to understand the simpler stuff—the difference between email clients and webmail. If you’ve ever started a Gmail, Hotmail, or other email account, chances are you’ve used webmail. If you work in an office and use a program like Microsoft Outlook, Windows Live Mail, or Mozilla Thunderbird to manage your emails, you’re using an email client.

Both webmail and email clients are applications for sending and receiving email, and they use similar methods for doing this. Webmail is an application that is written to be operated over the internet through a browser, usually with no downloaded applications or additional software necessary. All of the work, so to speak, is done by remote computers (i.e. servers and machines you connect to through the internet).

Email clients are programs that are installed on local machines (i.e. your computer, or the computers in your office) to interact with remote email servers to download and send email to whomever you might care to. Some the back end work of sending email and all of the front end work of creating a user interface (what you look at to receive your email) is done on your computer with the installed application, rather than by your browser with instructions from the remote server. However, many webmail providers allow users to use email clients with their service—and here’s where it may start to get confusing. Let’s run through a quick example to explain the difference.

We sign up for a new email address with Google’s Gmail and begin sending and receiving email through the webmail service. Google is providing two things for us—a web frontend, and a mail server backend for sending and receiving the emails. We communicate with the email server backend by using the webmail frontend. Through our pointing, clicking, and typing, we’re telling the email server who we want to send email to, and what we want to say.

But, we might decide that we don’t like Google’s new look for Gmail, so we decide to switch to an email client, like the free program Thunderbird. Instead of using our web based client (Gmail’s web interface) to interact with Google’s Gmail servers (the mail server backend), we use a program installed on our computers (in this case, Thunderbird) to contact the mail server backend ourselves, and sidestep webmail altogether. Google (and other webmail providers) offer all of these products, including the web frontend and the mail server backend. You can use both of them or only the mail server backend and still be using “Gmail.” And with that confusion dispelled, let’s take a look at the common email protocols you’ll run into using email clients or mobile phones.

POP3, Post Office Protocol


POP, or Post Office Protocol, is a way of retrieving email information that dates back to a very different internet than we use today. Computers only had limited, low bandwidth access to remote computers, so engineers created POP in an effort to create a dead simple way to download copies of emails for offline reading, then remove those mails from the remote server. The first version of POP was created in 1984, with the POP2 revision created in early 1985.
POP3 is the current version of this particular style of email protocol, and still remains one of the most popular. Since POP3 creates local copies of emails and deletes the originals from the server, the emails are tied to that specific machine, and cannot be accessed via any webmail or any separate client on other computers. At least, not without doing a lot of email forwarding or porting around mailbox files.
While POP3 is based on an older model of offline email, there’s no reason to call it obsolete technology, as it does have its uses. POP4 has been proposed, and may be developed one day, although there’s not been much progress in several years.

IMAP, Internet Message Access Protocol


IMAP was created in 1986, but seems to suit the modern day world of omnipresent, always-on internet connectivity quite well. The idea was keep users from having to be tied to a single email client, giving them the ability to read their emails as if they were “in the cloud.”
Compared to POP3, IMAP allows users to log into many different email clients or webmail interfaces and view the same emails, because the emails are kept on remote email servers until the user deletes them. In a world where we now check our email on web interfaces, email clients, and on mobile phones, IMAP has become extremely popular. It isn’t without its problems, though.
Because IMAP stores emails on a remote mail server, you’ll have a limited mailbox size depending on the settings provided by the email service. If you have huge numbers of emails you want to keep, you could run into problems sending and receiving mail when your box is full. Some users sidestep this problem by making local archived copies of emails using their email client, and then deleting them from the remote server.

Microsoft Exchange, MAPI, and Exchange ActiveSync


Microsoft began developing MAPI (sometimes called Messaging API) not long after IMAP and POP were first developed, although it has uses beyond simple email. Thoroughly comparing IMAP and POP to MAPI is pretty technical, and out of scope for many readers of this article. Simply put, MAPI is a way for applications and email clients to communicate with Microsoft Exchange servers, and is capable of IMAP style syncing of emails, contacts, calendars, and other features, all tied into local email clients or applications. This function of syncing emails is branded by Microsoft as “Exchange ActiveSync.” Depending on what device, phone, or client you use, this same technology might be called any of the three Microsoft products (Microsoft Exchange, MAPI, or Exchange ActiveSync), but will offer the same cloud-based email syncing as IMAP.
Because Exchange and MAPI are Microsoft products, only companies that own their own Exchange mail servers or use Windows Live Hotmail will be able to use Exchange. Many clients, including the default Android mail client and iPhone, are Exchange ActiveSync capable, giving Hotmail users IMAP style cloud-based email, despite Hotmail not offering true IMAP functionality.

Other Email Protocols


Yes, there are other protocols for sending, recieving, and using email, but most of us that are using plain old free webmail and mobile phones will be using one of these three major ones. Since these three technologies cover the needs of nearly all HTG readers, we won’t be spending time today talking about the others. If you have any experience using email protocols not listed here, we’re interested to hear about it—feel free to discuss them in the comments.

In Short: Which Do I Use to Set Up My Email?

Depending on your personal style of communicating and whom you prefer to get your email service from, you can pretty quickly narrow down how you should use your email.
  • If you use check your email from a lot of devices, phones, or computers, set up your email clients to use IMAP.
  • If you use mostly webmail and want your phone or iPad to sync with your webmail, use IMAP, as well.
  • If you’re using one email client on one dedicated machine (say, in your office), you might be fine with POP3.
  • If you have a huge history of email, you may want to use POP3 to keep from running out of space on the remote email server.
  • If you use Hotmail or an Exchange Server Email, MAPI or Exchange ActiveSync will give you similar cloud-based syncing, like IMAP.
  • If you don’t use Hotmail and you want email sync, use IMAP. If you do use it and want email sync, use MAPI/Exchange ActiveSync.

Saturday, December 3, 2011

HTG Explains: Understanding Routers, Switches, and Network Hardware


routerback
Today we’re taking a look at the home networking hardware: what the individual pieces do, when you need them, and how best to deploy them. Read on to get a clearer picture of what you need to optimize your home network.
When do you need a switch? A hub? What exactly does a router do? Do you need a router if you have a single computer? Network technology can be quite an arcane area of study but armed with the right terms and a general overview of how devices function on your home network you can deploy your network with confidence.

Understanding Home Networking Through Network Diagrams

Rather than start off with a glossary of networking terms—and in the process slam you with a technical terms with no easy point of reference—let’s dive right into looking at network diagrams. Here is the simplest network configuration available: a computer linked directly to a modem which is in turn linked through a phone line/cable/fiber optic uplink to the individual’s internet service provider.

It doesn’t get less complicated than this arrangement but there is a price to pay for the ultra-simplicity of the setup. This user cannot access the internet with a Wi-Fi device (thus no access for smart phones, tablets, or other wireless devices) and they lose out on the benefits of having a router between their computer and the greater internet. Let’s introduce a router and highlight the benefits of using one.  In the diagram below we’ve introduced two elements to the network: a wireless router and a laptop connecting to the network via that wireless connection.

When should you use a router? Given the low cost of home routers and the benefits gained from installing one on your network you should always use a router (which almost always includes a firewall feature).
Home routers are actually a a combination of three networking components: a router, a firewall, and a switch. In a commercial setting the three pieces of hardware are kept separate but consumer routers are almost always a combination of both the routing and switching components with a firewall added in for good measure. First let’s look at what the router function does.
At the most basic level a router links two networks together, the network within your home (however big or small) and the network outside your home (in this case, the internet). The broadband modem provided to you by your ISP is only suited to linking a single computer to the internet and usually does not include any sort of routing or switch functionality. A router performs the following functions:
  • IP sharing: Your ISP assigns you one IP address. If you have a desktop, a laptop, a media box on your TV, and an iPad, that one IP address clearly isn’t going to cut it. A router manages those multiple connections and ensures that the right packets of information go to the right places. Without this function there would be no way for a person on the desktop and a person on the laptop to both browse the web as their would be no distinguishing between which computer was requesting what.
  • Network Address Translation (NAT): Related to the IP sharing function, NAT modifies the headers in packets of information coming into and out of your network so that they get routed to the proper device. Think of NAT like a very helpful receptionist inside your router that knows exactly where every incoming/outgoing package should go and stamps the department on them accordingly.
  • Dynamic Host Configuration: Without DHCP you would have to manually configure and add all the hosts to your network. This means every time a new computer entered the network you would have to manually assign it an address on the network. DHCP does that for you automatically so that when you plug your XBOX into your router, your friend gets on your wireless network, or you add a new computer, an address is assigned with no human interaction required.
  • Firewall: Routers act as basic firewalls in a variety of ways including automatically rejecting incoming data that is not part of an ongoing exchange between a computer within your network and the outside world. If you request a music stream from Pandora, for example, your router says “We’re expecting you, come on in” and that stream of data is directed to the device that made the request. On the other hand if a sudden burst of port probing comes in from an unknown address your router acts as a bouncer and rejects the requests, effectively cloaking your computers. Even for a user with a single computer a simple $50 router is worth it for the firewall functionality alone.
In addition to the inside-to-outside network functionality outlined above, home routers also act as a network switch. A network switch is a piece of hardware that facilitates communication between computers on an internal network. Without the switching function the devices could talk through the router to the greater internet but not to each other—something as simple as copying an MP3 from your laptop to your desktop over the network would be impossible.
Most routers have 4 Ethernet ports which allow you to plug in 4 devices and have them communicate via the switch function. If you need more than 4 Ethernet connections you’ll need to upgrade to a router with a larger port bank (a rather expensive proposition that will usually only boost you up to 8 ports) or you can pick up a dedicated switch. Note: You only need to upgrade if you’re running out of physical ports for hard line connections. If you only have one computer and one networked printer plugged into your 4 port router (and everything else on your network is Wi-Fi based) there is no need to upgrade to gain physical ports. That said, let’s take a look at a network with a dedicated switch.

Although the 4-port limit on the super majority of home routers was more than enough for most home users, the last 10 years have brought a significant increase in the number of networkable devices within the home. It isn’t uncommon to have multiple computers, multiple game consoles, media centers, printers, file servers, and more that all connect to the Ethernet LAN (while you may get away with putting your Wii on the Wi-Fi network for things like dedicated video streaming and media server access it is much preferable to have a hard line connection). Once you’ve reached that level of device saturation it’s necessary to add in a switch with 8, 16, or more ports to properly support your growing home network.
As a side note, historically people often relied on hubs because they were so much cheaper than pricey switches. A hub is a a simple network device that does not examine or manage any of the traffic that comes through it—it’s a “dumb” network device—by contrast switches actually interact with the data packets and actively direct them. Because hubs have no management component there are frequent collisions between packets which leads to an overall decrease in performance. Hubs suffer from a number of technical shortcomings which you can read about here. Consumer grade networks switches have fallen in price so steeply over the last 10 years that very few hubs are even manufactured anymore (Netgear, one of the largest manufacturers of consumer hubs, no longer even makes them). Because of the shortcomings of network hubs and the low prices of quality consumer-grade network switches we cannot recommend using a hub. When you can pick up a perfectly good high-speed 8-port switch for $25 there’s no good reason to use an outdated hub on a home network—if you’re curious why a network admin would ever deploy a hub you can read about it here.
Returning to the topic of switches: switches are an excellent and inexpensive way to increase the size of your home network. If you outgrow the bank of 4 ports on the back of your router the simplest thing you can do to expand your network is to purchase a switch with an appropriate number of ports. Unplug the devices from your router, plug all the devices into the switch, and then plug the switch into the router. Note: switches have absolutely no routing functionality and cannot take the place of a router. Your router likely has a 4-port switch built into it but that does not mean your new 8-port dedicated switch can replace your router—you still need the router to mediate between your modem and switch.

Decoding Network Speed Designations


Now that you’ve got a clear picture of how exactly your network should be physically configured let’s talk about network speeds. There are two primary designations we are interested in: Ethernet and Wi-Fi. Let’s take a look at Ethernet first.
Ethernet connection speeds are designated in 10BASE. The original Ethernet protocol, now 30 years old, operated as a max speed of 10 Mbit/s. Fast Ethernet, introduced in 1995, upped the speed to 100 Mbit/s. Gigabit Ethernet was introduced shortly after that in 1998 but didn’t gain much traction in the consumer market until recently. As its name suggests, Gigabit Ethernet is capable of 1000 Mbit/s. You will commonly see these designations noted on networking gear and its packaging as 10/100 or 10/100/1000 indicating which Ethernet version the device is compatible with.
In order to take full advantage of the maximum speeds all the devices in the transfer chain need to be at or above the speed rating you want. For example, let’s say you have a media server in your basement with a Gigabit Ethernet card installed and a media console in your living room with a Gigabit Ethernet card but you are connecting the two together with a 10/100 switch. Both devices will be limited by the 100 Mbit/s ceiling on the switch. In this situation upgrading the switch would boost your network performance considerably.
Outside of transferring large files and streaming HD video content across your home network there is little need to go out and upgrade all your equipment to Gigabit. If your primary computer network usage involves browsing the web and light file transfers 10/100 is more than satisfactory.

Understanding Wi-Fi Speeds


Wi-Fi speeds are designated by letter, not by number. Unlike the easy to translate number-as-network-speed designation we find with Ethernet the Wi-Fi designations actually refer to the draft versions of the IEEE 802.11 networking standard that dictates the parameters of the Wi-Fi protocol.
802.11b was the first version widely adopted by consumers. 802.11b devices operate at a maximum transmission of 11 Mbit/s but the speed is highly dependent on signal strength and quality—realistically users should expect 1-5 Mbit/s. Devices using 802.11b suffer from interference from baby monitors, bluetooth devices, cordless phones, and other 2.4GHz band devices.
802.11g was the next major consumer upgrade and boosted the max transmission to 54 Mbit/s (realistically about 22 Mbit/s accounting for error correction and signal strength). 802.11g suffers from the same kind of 2.4GHz band interference that 802.11b does.
802.11n is a significant upgrade to the Wi-Fi standards—devices use multiple-input multiple-output antennas (MIMO) to operate on both the 2.4GHz and relatively empty 5GHz bands. 802.11n has a theoretical maximum of 300 Mbit/s but accounting for error correction and less than ideal conditions you can expect speeds in 100-150 Mbit/s range.
Like Ethernet, Wi-Fi speeds are limited by the weakest link in the direct network. If you have an 802.11n capable Wi-Fi router but your netbook only has an 802.11g capable Wi-Fi module you will max out at the 802.11g speeds. In addition to the speed limitations there is a very pressing reason for abandoning the oldest popular Wi-Fi protocol 802.11b. You must use the same level of encryption on every device in your network and the encryption schemes available to 802.11b devices are weak and have been compromised (WEP encryption, for example, can be compromised in a matter of minutes by a moderately skilled child). Upgrading your Wi-Fi router and wireless equipment allows you to upgrade your wireless encryption as well as enjoy faster speeds. If you haven’t done anything to secure your router now would be a good time to read our guide to locking down your Wi-Fi network against intrusion.
Also like Ethernet, upgrading to the maximum speed—in this case 802.11n—is best suited for people moving large files and streaming HD video. Upgrading to 802.11n will have a negligible impact on your web browsing speed but will have an enormous impact on your ability to wirelessly stream HD content around your home.

At this point you’ve got a handle on how your home network needs to be laid out and you have an understanding of what the network speed designations mean and how they impact you and your network. It’s time to upgrade your switch, roll out some new Wi-Fi bandwidth, and enjoy a better optimized home network.

Wednesday, November 23, 2011

What Are These desktop.ini Files I Keep Seeing?

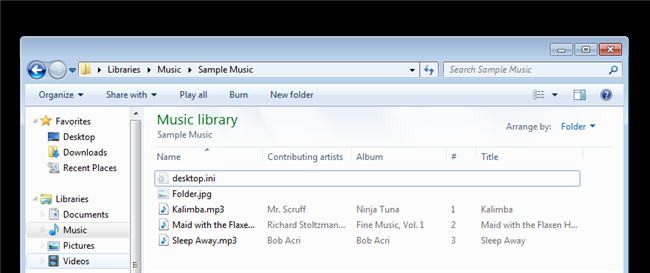
sshot-3
Have you ever seen those weird desktop.ini files that seem to pop-up everywhere? The truth is that they do serve a purpose and Windows uses them to identify how a folder should be displayed, much like the .DS_Store files used in OS X.
When you create a new folder in Windows it is created with the standard folder icon, one common use of the desktop.ini file is to use to it set a custom icon for a folder, however this is not the only thing that it is used for. A typical desktop.ini will look like something like this:
[.ShellClassInfo]
ConfirmFileOp=0
IconFile=Folder.ico
IconIndex=0
InfoTip=Type Your InfoTip Here.
The desktop.ini file can contain alot of attributes but the following custom attributes are the most common:
  • ConfirmFileOp
  • IconFile
  • IconIndex
  • InfoTip
ConfirmFileOp
If set to 0, avoids the “You Are Deleting a System Folder” when deleting or moving a folder.
IconFile
Specify a custom icon file. You can use either a .ico, .exe or .dll file.
IconIndex
Specify the index for a custom icon. If the file assigned to IconFile only contains a single icon, the IconIndex should be set to 0.
InfoTip
A string of text that will be displayed when you hover over the folder.
As you can see the desktop.ini file holds folder customization information. They are hidden by default and will only be displayed if you choose to Display Protected Operating System Files by unchecking the checkbox.

You can customize your folders by creating your own desktop.ini folder in Notepad. Make sure to change the type to Unicode before saving though.

When Do You Need to Update Your Drivers


Talk to any tech person, read any forum, and at some point you’re sure to be told to update your drivers… but what does that really mean? And is it necessary to compulsively update your drivers? Here’s our take.

Drivers? What Are Drivers?

In very simple terms, drivers are computer programs that let Windows and your other applications interact with a hardware device. Your computer doesn’t natively know how to use all the features of your video card—it needs a driver to do that. Just like computer programs have updates and service packs to fix bugs and add features, drivers do as well.

When Should You Update Your Drivers?

Rule: Don’t fix what isn’t broken.
If you’ve got a problem with a device, you should think about upgrading the drivers. If you’re looking for a speed boost, updating your drivers to the latest version isn’t a magical speed enhancement that will suddenly remove the need to upgrade a slow PC. If you’re upgrading from one version of a driver to another version, chances are good that the only things included in those updates are bug fixes for specific scenarios, and maybe some very minor performance increases. There’s more chance of breaking something than anything else, so if everything on your PC is working just fine, you can skip the driver updates for the most part.
There’s a notable exception to this rule, of course. If you’re trying to eke out every tiny bit of performance out of your system, you should make sure that your video card drivers are updated using the manufacturer’s drivers, and you probably want to upgrade your chipset, networking, and sound card drivers as well. Switching from the built-in Windows drivers for your video card to the official NVidia or ATI/AMD drivers will make a world of difference, and keeping them updated can yield huge speed gains.
Essentially, if you’ve got an AMD/ATI or NVidia video card, and you’re using the built-in Windows drivers, that’s a great time to switch drivers. Otherwise, most people can skip the process entirely.

Which Drivers Should You Update?

Rule: Use the right drivers, not just the latest ones.
When you first get a new PC, reload Windows on an old PC, or build a new PC, you’re going to want to make sure that you are using the correct drivers. It’s not so much that you’ll need to keep the drivers updated to the very latest version all the time, it’s that you don’t want to be using some generic driver when you could be using the real driver. For instance: video card drivers included in Windows rarely include all the features of the drivers you can download from NVidia or AMD/ATI, and they definitely don’t include the same speed enhancements.
Whatever you do, don’t use some driver update software when you can manually pick the right drivers easily.
Off the Shelf PC
If you’re running an off-the-shelf PC or laptop and haven’t reloaded Windows manually, chances are good that most of your drivers are already using the manufacturer’s approved drivers. This includes things like chipset, motherboard, sound card, and the like. There’s also a really good chance that you have some onboard generic video card. Your best bet is to upgrade your video card drivers by heading to the manufacturer’s site, though you could just use the Upgrade driver feature built into Windows and explained below.
Again, if everything is working just fine on your PC, you should probably leave your drivers alone.
Fresh Windows Install / Built Your Own PC / Gamer
If you either built your own PC or loaded a fresh version of Windows, you’re currently using the Microsoft-approved drivers included in Windows, which aren’t always going to be the fastest choice, especially if you have a real video card. This is a scenario in which you’ll want to update these drivers:
  • Video Card: The difference in speed between the generic Windows drivers for your video card and the official NVidia or ATI/AMDdrivers will surprise you. Even if you aren’t a gamer, make sure you have the real drivers.
  • Motherboard/Chipset: you’ll want to make sure to head to the manufacturer’s site and grab their chipset drivers. If you bought a PC, head to their site, if you built one, go to the motherboard manufacturer’s site. Every installer is different, but in general, you can just run the downloaded driver.
  • Sound Card:the native Windows drivers won’t include all the extra sound features like virtual surround, etc. If you bought a PC, head to their site, if you built one, either go to the motherboard manufacturer’s site for onboard sound, or the sound card manufacturer’s web site otherwise.
  • Network Card: most likely you’re using some type of onboard card that’s part of the motherboard, and you already grabbed the drivers from there.
If you’re a gamer, you’ll probably want to make sure to keep your video card drivers updated regularly.

Checking Your Driver Versions

When you’re having problems with a device, it can be very helpful to know what version of the driver you’re using, especially if you’re posting on a forum, or reading a thread somewhere about a problem that was fixed in a particular driver update.
To check the driver version, just open up Device Manager using the Start Menu search box, find the driver in the list, right-click and choose Properties. You’ll be able to see the version information and date on the Driver tab. You can also update, roll back, disable, or uninstall a driver from this view, which comes in very handy if you upgraded your drivers and introduced a problem.

Updating Your Drivers the (Safe) Microsoft Way

If you are having a problem with a particular device, you can quickly upgrade to a newer version by opening Device Manager, right-clicking on the device, and choosing Update Driver Software.

This will pop up a wizard that lets you either search Windows Update or your PC for the latest drivers—or you can manually install the drivers by using the Browse option.

If you let Windows automatically update, it’ll install right away and ask you to reboot. If it fixes your problem, great—if not, you can always roll back the driver.

Updating Your Drivers with the Manufacturer Drivers

For the most part, when you download drivers from somewhere like NVidia or AMD/ATI, they will have an entire driver installation wizard included in the download, so you’ll just run that to upgrade the drivers to the latest version. If you happen to find a driver (perhaps for a device that is giving you an error) that is in a zip file, you can use the wizard screen above and choose the Browse option. This will show a window like this, where you can specify the folder that you unzipped the drivers to.

Final thought: If your computer is working fine, don’t use this article as a reason to go break it. Or at least, don’t blame us if you do =)

Wednesday, October 26, 2011

Why Computer Voices Are Mostly Female


STORY HIGHLIGHTS
  • Studies have shown people generally find women's voices more pleasing than men's
  • Scholar: "It's much easier to find a female voice that everyone likes than a male voice"
  • In Germany, some BMW drivers refused to take GPS directions from a woman
  • Tech companies may avoid male computer voices because of HAL from the move "2001"
(CNN) -- To most owners of the new iPhone, the voice-activated feature called Siri is more than a virtual "assistant" who can help schedule appointments, find a good nearby pizza or tell you if it's going to rain.
She's also a she.
Siri answers questions in a part-human, part-robot voice that's deep, briskly efficient and distinctly female. (At least in the U.S. and four other countries. In France and the UK, Siri is male.)
People describe the app using female pronouns. Her gender has even prompted some users to flood blogs and online forums with sexually suggestive questions for Siri such as "What are you wearing?" (Siri's baffled response: "Why do people keep asking me this?")
The fuss over Siri's sex also raises a larger question: From voice-mail systems to GPS devices to Siri and beyond, why are so many computerized voices female?
One answer may lie in biology. Scientific studies have shown that people generally find women's voices more pleasing than men's.
"It's much easier to find a female voice that everyone likes than a male voice that everyone likes," said Stanford University Professor Clifford Nass, author of "The Man Who Lied to His Laptop: What Machines Teach Us About Human Relationships." "It's a well-established phenomenon that the human brain is developed to like female voices."
HAL, the homicidal artificial intelligence in \
HAL, the homicidal artificial intelligence in "2001: A space Odyssey," may have scared manufacturers away from male automated voices.
Research suggests this preference starts as early as the womb, Nass said. He cites a study in which fetuses were found to react to the sound of their mother's voice but not to other female voices. The fetuses showed no distinct reaction to their father's voice, however.
Another answer lies in history. According to some sources, the use of female voices in navigation devices dates back to World War II, when women's voices were employed in airplane cockpits because they stood out among the male pilots. And telephone operators have traditionally been female, making people accustomed to getting assistance from a disembodied woman's voice.
When automakers were first installing automated voice prompts in cars ("your door is ajar") decades ago, their consumer research found that people overwhelmingly preferred female voices to male ones, said Tim Bajarin, a Silicon Valley analyst and president of Creative Strategies Inc.
This may explain why in almost all GPS navigation systems on the market, the default voice is female. One notable exception has been Germany, where BMW was forced to recall a female-voiced navigation system on its 5 Series cars in the late 1990s after being flooded with calls from German men saying they refused to take directions from a woman.
"Cultural stereotypes run deep," said Nass, who details the BMW episode in his book.
Voice casting
Most companies that produce automated voices hold auditions for voice actors and collect recordings of them speaking. Then they invite focus groups to listen to the recordings and rate the voices on how well they convey certain attributes: warmth, friendliness, competence and so on.
"It's casting," Nass said. "It's something Hollywood has known for a long, long time."
Look no further than examples of automated or artificial-intelligence voices in sci-fi movies and TV shows. Voices of authority or menace tend to be male: the homicidal HAL 9000 computer in "2001: A Space Odyssey," the computer program in "WarGames," or Auto, the spaceship's autopilot function in "Wall-E." More subservient talking machines, such as the onboard computer from the "Star Trek" TV series, skew female.
Bajarin, the Silicon Valley analyst, believes that more computerized voices would be masculine if not for the associations with HAL, whose malicious intent in the 1968 Stanley Kubrick film was made even creepier by his soothing tone.
"A lot of tech companies stayed away from the male voice because of HAL," he said. "I've heard that theory tossed around multiple times." (One prominent exception: The chipper "You've got mail!" voice from AOL's dial-up days.)
What Apple did is absolutely brilliant. They took Siri and gave it more of a personality.
Norman Winarsky
When it comes to consumer applications of computerized voices, the sex of the voice is usually determined by what service or product is employing it. For example, transit systems such as the San Francisco Area's BART often use higher-pitched voices because they are easier to hear over the clatter of the train cars.
Nuance, a Massachusetts-based company that develops speech technologies for Ford vehicles' SYNC system, Amazon e-readers and other clients, creates both male and female voices. It's then up to the client to choose which voice, and gender, best fits their product, said chief creative officer Gary Clayton.
"As these products become part of our everyday lives, there's a huge opportunity for personalization," added Brant Ward, the company's director of advanced speech design. "I could have an approximation of my wife's voice read me a text message in my car."
Siri: Brilliant or sexist?
Siri, the iPhone 4S's voice, grew from a five-year research project that was funded by military agency DARPA and led by SRI International, a Bay Area research institute. The project spawned a company, also called Siri, that launched an iPhone app in February 2010 and was acquired by Apple two months later.
That original Siri voice-to-text app -- powered in part by Nuance's technology -- also worked by people speaking commands into their phones, although it didn't talk back. And it had no gender. In fact, the app was originally conceived to speak in a gender-neutral voice, said Norman Winarsky, vice president of SRI and a co-founder of Siri.
"What Apple did is absolutely brilliant," said Winarsky, who calls speech "the most natural of all human interfaces."
"They took Siri and gave it more of a personality," he said. "It's the first real artificial intelligence working in millions of people's hands."
An Apple spokeswoman declined to comment on why the company gave Siri a female voice in the U.S. Nor would she say why Siri speaks like a man in the UK, where iPhone 4S owners have swarmed online forums to request a female voice instead. "Eww!! Hope UK gets female voice soon," wrote one commenter. "I don't think anyone in the US cares about male voice option."
Many GPS devices and computer text-to-speech programs now offer multiple voice options. And someday soon, voice-technology experts say, Siri will probably speak in a variety of voices, too.
Until then, some bloggers have wondered: Are computerized female "assistants" sexist?
Not necessarily, said Rebecca Zorach, director of the Social Media Project at the University of Chicago's Center for the Study of Gender and Sexuality.
"I think they have to be understood in a broader context in which they're one small piece," she wrote in an e-mail to CNN. "Voices intended to convey authority (such as voice-over narration in films) tend to be male. So yes, probably these compliant female robot voices reinforce gender stereotypes, not just because they serve the user but because the technology itself is about communication and relationships (areas that women are presumed to be good at).
"I wouldn't automatically claim any sexism in individual companies' choices, though. Most such decisions are probably the result of market research, so they may be reflecting gender stereotypes that already exist in the general public."
Zorach listened to some sound clips of Siri online, then e-mailed back again.
"What's interesting to me is how they seem to intentionally make her speech sound artificial -- they could choose to make her speech more seamless and human-like, but they choose instead to highlight the technology," she said. "That makes you aware of how high-tech your gadget is."

100+ Google Tricks That Will Save You Time

With classes, homework, and projects–not to mention your social life–time is truly at a premium for you, so why not latch onto the wide world that Google has to offer? From super-effective search tricks to Google hacks specifically for education to tricks and tips for using Gmail, Google Docs, and Google Calendar, these tricks will surely save you some precious time.
Search Tricks
These search tricks can save you time when researching online for your next project or just to find out what time it is across the world, so start using these right away.
  1. Convert units. Whether you want to convert currency, American and metric units, or any other unit, try typing in the known unit and the unknown unit to find your answer (like “how many teaspoons in a tablespoon” or “10 US dollars in Euros”).
  2. Do a timeline search. Use “view:timeline” followed by whatever you are researching to get a timeline for that topic.
  3. Get around blocked sites. If you are having problems getting around a blocked site, just type “cache:website address” with website address being the address of the blocked site to use Google’s cached copy to get where you are going.
  4. Use a tilde. Using a tilde (~) with a search term will bring you results with related search terms.
  5. Use the image search. Type in your search word, then select Images to use the image search when trying to put a picture to your term.
  6. Get a definition. If you want a definition without having to track down an online (or a physical) dictionary, just type “definition:word” to find the definition of the word in your results (i.e.: “definition: serendipity” will track down the definition of the word “serendipity”).
  7. Search within a specific website. If you know you want to look up Babe Ruth in Wikipedia, type in “site:wikipedia.org Babe Ruth” to go directly to the Wikipedia page about Babe Ruth. It works for any site, not just Wikipedia.
  8. Search within a specific kind of site. If you know you only want results from an educational site, try “site:edu” or for a government site, try “site:gov” and your search term to get results only from sites with those web addresses.
  9. Search for a specific file type. If you know you want a PDF (or maybe an MP3), just type in “filetype:pdf” and your search term to find results that are only in that file type.
  10. Calculate with Google. Type in any normal mathematical expressions to get the answer immediately. For example, “2*4″ will get you the answer “8.”
  11. Time. Enter “what time is it” and any location to find out the local time.
  12. Find a term in a URL. This handy trick is especially useful when searching blogs, where dates are frequently used in the URL. If you want to know about a topic for that year only and not any other year, type “inurl:2009″ and your keyword to find results with your keyword in URLs with 2009 in them.
  13. Use Show Options to refine your search. Click “Show Options” on your search result page to have access to tools that will help you filter and refine your results.
  14. Search for a face. If you are looking for a person and not just their name, type “&imgtype=face” after the search results to narrow your results to those with images of faces.
Google Specifically for Education
From Google Scholar that returns only results from scholarly literature to learning more about computer science, these Google items will help you at school.
  1. Google Scholar. Use this specialized Google search to get results from scholarly literature such as peer-reviewed papers, theses, and academic publishers.
  2. Use Google Earth’s Sky feature. Take a look at the night sky straight from your computer when you use this feature.
  3. Open your browser with iGoogle. Set up an iGoogle page and make it your homepage to have ready access to news stories, your Google calendar, blogs you follow in Google Reader, and much more.
  4. Stay current with Google News. Like an electronic clearinghouse for news, Google News brings headlines from news sources around the world to help you stay current without much effort.
  5. Create a Google Custom Search Engine. On your own or in collaboration with other students, put together an awesome project like one of the examples provided that can be used by many.
  6. Collect research notes with Google Notebook. Use this simple note-taking tool to collect your research for a paper or project.
  7. Make a study group with Google Groups. Google Groups allows you to communicate and collaborate in groups, so take this option to set up a study group that doesn’t have to meet face-to-face.
  8. Google Code University. Visit this Google site to have access to Creative Commons-licensed content to help you learn more about computer science.
  9. Study the oceans with Google Earth 5. Google Earth 5 provides information on the ocean floor and surface with data from marine experts, including shipwrecks in 3D.
  10. Learn what experts have to say. Explore Knol to find out what experts have to say on a wide range of topics. If you are an expert, write your own Knol, too.
Google Docs
Google Docs is a great replacement for Word, Excel, and PowerPoint, so learn how to use this product even more efficiently.
  1. Use premade templates. Use these 50 pre-made templates to track spending, keep up with your health, and much more.
  2. Collaborate on group projects. Google Docs allows for real-time collaboration, so make easy work for everyone next time you have a group project due.
  3. Use keyboard shortcuts. Use this handy list of keyboard shortcuts to save lots of time while using Google Docs.
  4. Create online surveys for research projects. Quickly and easily create online surveys for any research project that requires feedback from others. The answers are saved to your Google Docs account.
  5. Add video to your presentation. Learn how to seamlessly add video to your Google Docs page to really give your presentation or project a boost.
  6. Use the school year calendar template. Have an easy to use school year calendar through Google Docs by following these instructions.
  7. Create graphs from spreadsheets. Once you have populated a spreadsheet with data, you can easily create a graph. Google Docs allows for pie, bar, line, and scatter graphs.
  8. Create a new document with shortcuts. Learn two ways to open a new Google Docs page with these tricks.
  9. Right click to use save-as. Use the right click save-as option to save a Google Docs document on your computer.
  10. Send invitations. School shouldn’t be all about work. Find out how to send party invitations using Google Docs.
Gmail
The super-popular Gmail is full of fun and fast ways to make your life and communications easier.
  1. Use the Tasks as a to-do list. Use the Tasks available in Gmail as a way to stay on top of assignments, exams, and project due dates.
  2. Use the Archive feature. One of the great features of Gmail is that it allows you to archive emails to get them out of your inbox, then you can use the search feature to find them if you need them again.
  3. Highlight mail with labels. Use labels to mark your messages. You can find them easily while in your inbox and do a search for all the messages with that label after you archive them.
  4. Never forget to attach a file. By signing up for the Labs, you can select to have the Forgotten Attachment Detector. This feature notices if you have typed something about an attachment in the body, but are sending without actually attaching anything–a great tool to save time and embarrassment.
  5. Use keyboard shortcuts. Go to Settings and enable keyboard shortcuts so you can perform common tasks at the touch of just one or two keys.
  6. Add multiple attachments. Use the Control (or Cmd on Macs) and Shift keys to select more than one file to attach to your email at one time.
  7. Use the https option. Google recommends using this option if you use your Gmail in public places like a dorm or coffee shop to add an extra bit of protection to your Internet activities.
  8. Incorporate Google Calendar and Docs on your Gmail page. Have access to recent documents used in Google Docs and get an agenda of upcoming activities you have on Google Calendar with small boxes added to your Gmail page. Go to Labs to select this option.
  9. Add a “Waiting for Response” label. If you have emails in your inbox that you are holding until someone gets back to you, creating this label keeps you from forgetting to follow up on it later.
  10. Use Canned Responses. If you find yourself writing the same type of email over and over, use the Canned Responses feature in the Labs to create a template that you you can use without having to type out the entire email every time.
  11. Consolidate email accounts. If you have a Gmail account, an account through school, and any other account you are juggling separately, combine them all into Gmail to cut down on time spent checking all those accounts.
  12. Use AIM in Gmail. If you use AIM to IM friends or partners on projects, add it to the chat feature already in Gmail to have access to both.
Google Calendar
Save yourself some time by keeping track of appointments, assignments, and more with Google Calendar.
  1. Sync up with others using iCal or Sunbird. Google lets you sync your calendar with others using Apple iCal or Mozilla Sunbird.
  2. Customize reminders. Set reminders in your Google Calendar so that you never forget an appointment again. Choose from email, pop-up, or SMS reminders and even set when the reminder comes.
  3. Learn some basic keyboard shortcuts. Change from daily to weekly to monthly view, compose a new event, and more with these simple shortcuts.
  4. Use Quick Add. Click on Quick Add and type the day and time and what you are doing to have the calendar create the event with the correct time and date.
  5. Use multiple calendars. Create separate calendars for school work, personal information, important due dates, and more to stay ultra-organized.
  6. Get a text message with your daily agenda. Keep up with all that you need to do for the day without ever having to log on to your Google Calendar.
  7. Set weekly repeats for any day. The drop-down menu only offers M/W/F or T/Th options for repeating events. Go to “Every Week” and customize which days you want the event to repeat.
  8. Get upcoming events while away from the computer. Check out #8 in this list to learn how to access your upcoming events via your phone.
  9. Add events from Gmail. If you receive an email with event time and date information, you can easily add this event to your calendar by clicking “Add to calendar.”
  10. Invite others. If you have events on your calendar that you want to invite others to join, just add their email address under Add Guests within the event.
Google Mobile
Whether riding the bus or walking to class, use Google Mobile to stay productive while away from your computer.
  1. Sync your calendar. Never be far from your Google Calendar when you sync it to your phone.
  2. Check your email. Keep your email right at your fingertips with Gmail for mobile.
  3. Access your blog subscriptions. Keep up with your blogs and news feeds that you subscribe to through Reader right on your phone.
  4. Use Google Voice to consolidate phone numbers. If you have a phone in your dorm or apartment, a cell phone, and any other phone numbers, consolidate them into one number with Google Voice.
  5. Easily find friends. Find out where your friends are and even get a map with directions for how to get there with Google Latitudes.
  6. Find out information easily while on the go. Whether you are looking for a great place to eat dinner, wondering what the weather is like, or want to know what the Spanish word for “bathroom” is, just text your information to Google (466453–spells Google on your phone) to get the answer texted back right away.
  7. Access iGoogle. Get your iGoogle page formatted just for the smaller screen size of your phone.
  8. Read your Google Docs. Have access to all your Google Docs items right on your phone.
  9. Keep a to-do list on your phone. Use Google Tasks for mobile so you can access your to-do list any time–and check off what you’ve finished, too.
  10. Never get lost again. Google Maps is an interactive program for most smart phones that offers tons of features so you will never have to be lost again.
  11. Do a quick search anywhere. Find information with a Google search from your phone to impress your professors and your friends.
  12. Access Google Books. Android and iPhone users can access Google Books on their phones.
  13. Post to your blog. Use your mobile to post to your Blogger blog.
Google Chrome Tips and Extensions
If you are using the Google Chrome browser, then you will love these time-saving tips and extensions.
  1. Use a “Pin Tab”. If you have multiple tabs open, use a “Pin Tab” to make the tabs the size of the little icon on the left side.
  2. Don’t overlook Paste and Search and Paste and Go. These two features are available when you right-click to add a word or URL to Chrome and will save you an extra step.
  3. Reopen a closed tab. Oops! If you didn’t mean to close that tab, just press Ctrl+Shift+T to reopen it.
  4. Use the Chrome shortcuts. Open a new tab, see your history, maximize your window, and much more with these shortcuts.
  5. Take advantage of the address bar. With Google Chrome, you can use the address bar to perform a Google search, quickly access pages you’ve already visited, and get recommendations for places to go.
  6. Go incognito. If you don’t want to leave traces of where you were browsing, use incognito mode instead of having to go back and delete your history and cookies.
  7. Use the bookmarks manager. Stay organized, rearrange bookmarks, search for bookmarks, add folders, and much more with the bookmark manager.
  8. ChromePass. This tool will give you a list of all the password information stored in Google Chrome.
  9. Save as PDF. Save any page as a PDF with this bookmarklet.
  10. ChromeMailer. If you’ve lost valuable time when having to manually enter email information from a website because Google Chrome doesn’t support the mailto: function, then you will love this extension.
  11. Google Chrome Backup. Back up your personal data, bookmarks, and more with this simple tool.
Google Books
Learn how Google Books can save you time and trips to the library with these tricks.
  1. Search full text. Google Books offers full text for over 10,000 books, so look here the next time you are researching something at the last minute.
  2. Use “About this book”. At the top left of the page of a book, clicking this link will give you helpful information such as the table of contents, related books, and a map of places mentioned in the book.
  3. Create a personalized library. Click on “Add to my shared library” to start your own personalized library where you can label books to keep them organized for each class or project.
  4. Find books in your college library. Each book in Google Books has a link to find the book in a library. It can tell you exactly where to look at your own school.
  5. Use the Advanced Book Search. If you can’t find the book you are looking for, try the advanced search, which provides you with many more detailed options.
  6. Access text books. Many text books are available on Google Books, so see if you can save a trip to the bookstore next semester.
  7. Search for magazine content. Select Magazines in the Advanced Book Search to locate information from magazines.
  8. Read the blog. Google Books is constantly evolving, so stay on top of all the latest news with the Inside Google Books blog.
  9. Find books to supplement your assigned texts. Search by subject to see what books you may be able to read to get the extra leg up in your classes.
Handy Google Services and Apps
These other Google products will help you save time by offering you everything from alerts to online collaboration to help working with data sets.
  1. Google Alerts. Sign up to get email notifications any time a topic you designate shows up in Google search results. This is a great way to stay current with a project or news story.
  2. Google Desktop. Keep a clock, weather, news stories, Google search box, and more all within easy reach when you use Google Desktop.
  3. Google SketchUp. If you need to draw 3D figures for class, use Google SketchUp to do so easily and free of charge.
  4. Google Talk. This versatile app is more than just for IMs. You can switch to voice, do a video chat, and send texts, too.
  5. Google Images. Google has an incredible image search feature that will provide you with tons of high-quality images you can use in presentations.
  6. Google Translate. Don’t spend time looking up stuff in books, use Google Translate to get foreign words translated right away.
  7. Google Wave. This brand new Google product shows great promise for anyone collaborating, but especially for those in school. Communicate, create documents, and more–all in real-time.
  8. Google Finance. Business students can keep track of markets, news, portfolios, and more in one place.
  9. Google Toolbar. Have easy access to Gmail, Google search, bookmarks, and more with this toolbar available for Internet Explorer and Firefox.
  10. Picasa. Manage your photos and even incorporate them into your blogs and emails with Google’s streamlines photo manager.
  11. Google Squared. Find facts and organize them with this search feature from Google Labs.
  12. Google Fusion Tables. If you are working with data sets, then you will love this program that will allow you to upload data, create visual representations, and take part in discussions about the data.
  13. Blogger. Create a blog as a part of a project or just to stay in touch with friends and family in an easy way.

Friday, September 16, 2011

20 Windows Keyboard Shortcuts You Might Not Know


Mastering the keyboard will not only increase your navigation speed but it can also help with wrist fatigue. Here are some lesser known Windows shortcuts to help you become a keyboard ninja.
Image by Remko van Dokkum

Global Windows Shortcuts

Win+1, 2, 3, 4, etc. will launch each program in your taskbar. It is helpful then to keep your most used programs at the beginning of your task bar so you can open them one right after another. This also works in Windows Vista for the quick launch icons.

Win+Alt+1, 2, 3, etc. will open the jump list for each program in the taskbar. You can then use your arrows to select which jump list option you want to open.

Win+T will cycle through taskbar programs. This is similar to just hovering over the item with your mouse but you can launch the program with Space or Enter.

Win+Home minimizes all programs except current the window. This is similar to the Aero shake and can be disabled with the same registry key.
Win+B selects the system tray which isn’t always useful but can come in very handy if your mouse stops working.

Win+Up/Down maximizes and restores down the current window so long as that window has the option to be maximized. It is exactly the same as clicking on the middle button on your windows.
Alt+Esc is like Alt+Tab but switches windows in the order they were opened and does not have the fancy window preview overlay.
Win+Pause/Break will open your system properties window. This can be helpful if you need to see the name of a computer or simple system statistics.

Ctrl+Esc can be used to open the start menu but will not work as a Windows key replacement for other shortcuts.
Ctrl+Shift+Esc will open the task manager without needing to hit Ctrl+Alt+Del first.

Alt+Space will open the window system menu which can be used to maximize (x), minimize (n), close (c), or move (m) the window which can be especially helpful if your window is somehow off-screen. This shortcut can also be helpful with windows that don’t close with the Alt+F4 shortcut such as the command window.

Windows Explorer Shortcuts

Here are handy shortcuts built into Windows Explorer which may have similar features in other programs too.
Alt+Up will navigate up one folder level since the up arrow on the menu bar was removed in Windows Vista. Alternatively, you can also make Backspace go up one folder level with a handy AutoHotKey script.
Shift+F10 opens the contextual or “right click” menu for a file/folder. This can be very handy for speed especially if you know which option you want to select. Look for an underlined letter in each option to know which letter you can press for faster access.

Shift+Del deletes a file without sending it to the recycle bin because who wants to empty their recycle bin anyway?
Ctrl+Shift+N creates a new folder in your current directory.
Alt+Enter opens the file properties so you can view file size, sharing settings, and creation date.

F2 renames a file or folder.
F3 will open explorer and select the search bar. If you already have an explorer window open it will highlight the search bar. In some programs it will also open the search dialog to search within that program.

F6 cycles objects in the current window. In explorer this will cycle between the location bar, options bar, left pane, and right pane. It also works with varying success in other programs.
F10 toggles the file menu in explorer.