Showing posts with label Networking. Show all posts

Tuesday, October 29, 2013

Extend your Wi-Fi network throughout the house

The wireless signal from Aidan's router doesn't reach throughout the house. Here are a few ways to fix the problem.
Extending a Wi-Fi network can be as easy as playing with cardboard and tape, or as difficult as rewiring your house. It all depends how big a boost you need, and how much time and money you're willing to devote to the task.
Here are three ways to increase your signal's range.

Boosters

You know those little antennas that screw onto your router? You can improve the signal by replacing them with bigger antennas, or more directional ones.
You can also improve the existing antenna, making it directional. All you need is a few minutes and some common household materials. See Extend Your Wi-Fi Range With a Parabolic Reflectorfor detailed instructions.
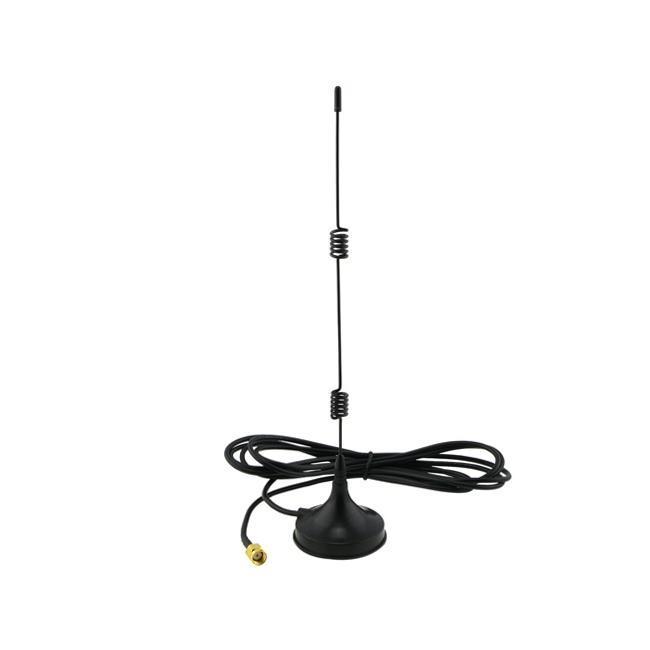
If you're not the do-it-yourself type, or if you need to boost the signal in all directions, you can buy a generic antenna for a few dollars. I've seen this same antenna (see image to the right) sold under different brand names--priced from $2 to $7. And yes, I've tried it and it helps…a bit.
For a more powerful boost than either of those, try the directionalTP-Link TL-ANT2409A. You can get it for $25 if you shop around.

Extenders

You plug one of these devices, also called repeaters, into a wall socket as far from the router as you can get and still receive a good signal. The extender picks up the signal and rebroadcasts it.
In general, I find these more effective than boosters. But they're also more expensive, and are trickier to set up, since you have to find the best location and connect them to the network.
The best one I've tested (and I haven't tested all that many) was theAmped Wireless REC10. If you look around, you can buy one for $70.In general, I find these more effective than boosters. But they're also more expensive, and are trickier to set up, since you have to find the best location and connect them to the network.

HomePlug

I used to be a fan of this technology, which carries network data over your house's electric wiring. The adapters are basically power bricks with Ethernet ports. Some also have Wi-Fi Antennas.
You won't have much trouble adding HomePlug to your network--you just plug it in and it works…if it works.
All sorts of things can interfere with HomePlug signals--wiring, the location of the washing machine, the type of light bulbs you use.
I used HomePlug happily for years. It didn't give me Ethernet speed or even 802.11n speed, but it was faster than my Internet connection and that was all that I needed. Then it just stopped working. I never figured out way.
A HomePlug/Wi-Fi kit--two receivers, one of them with an antenna--will cost you about $90. You can check out the HomePlug Alliance's Products page.

Saturday, September 7, 2013

Three Wireless Display Technologies That You Probably Own But Don’t Use

Want to relay your smartphone’s or laptop’s display onto a larger screen without wires? No, it’s not science fiction. You can wirelessly output video from computers and smartphones today. Wireless display technologies use WiFi to output video to compatible adapters. You only need a display adapter, which connects to a monitor and a WiDI or Miracast compatible device. Most modern devices are compatible with the technology. There’s also Apple’s proprietary technology, AirPlay.
Noticing wireless display technology on all my devices, I recently set up a Miracast adapter. This article summarizes my experience. While setup doesn’t require much effort, it can require a bit of leg work.

WiDi

Intel developed the Wireless Display (WiDi) technology as a means of streaming video and audio from compatible devices. WiDi inhabits on most modern Intel motherboards, in particular all Ultrabook-branded laptops.
Additionally, WiDi will also soon receive support for Miracast in its 3.5 incarnation, meaning that the two major wireless displays will actually converge. This is practically unheard of among competing standards. Typically, they fight to the death.
WiDi shows up in many second generation Intel Core-series processors. Ivy Bridge through Haswell can incorporate WiDi, although it does not exist on all Intel computers.

AirPlay

AirPlay, unlike WiDi or Miracast, is a proprietary technology. It’s only compatible with Apple TVand other officially vetted brands. You can’t purchase an adapter that will stream to any device, as you might with WiDi or Miracast. AirPlay’s great advantage over other wireless display standards is its ability to function with AirPlay enabled-speakers.
Apple intended for the technology to allow mobile devices to function as remote controls and streaming devices. It licenses out AirPlay to a variety of audio-equipment manufacturers — such as Sony, Pioneer and Philips.
Overall, AirPlay possesses far fewer vices and foibles than Miracast.
You can check out AirPlay in action below:

Miracast

Miracast is based on WiFi Direct, which enables handsets to communicate with one another, without connecting to a network. It uses WiFi as a direct means of interfacing with another computer. Miracast uses a variation on this technology to allow the output of audio and video, without a wired interface. However, the Miracast specification makes no provision for audio-only devices, such as MP3 players.
On the downside, Miracast is a new format. As such, it has suffered from a huge number of teething troubles, including display quality issues, lag and instability. I’ve experienced a great deal of issues related to compatibility. Miracast devices don’t work well with all versions of Android. For example, my Android 4.2.1 device failed to output display when it updated to Android 4.2.2.

How I Set Up My Miracast Device

Here’s a shot of the Netgear Push2TV PTV3000 device – it’s both Miracast and WiDi compatible, meaning I could choose to output the display from either my smartphone or my personal computer. It’s also capable of running off the power provided through a USB port. I ran it off of my display’s USB ports.
netgear attached to PC
Setting it up was super simple: I plugged the device into a power source and then activated Wireless Display on my smartphone. From there, simply choose the appropriate display from the list and connect to the Push2TV device.
wireless video output
The Push2TV PTV3000 device wasn’t cheap – at $60 on Amazon – and it didn’t set up very easily. It required a firmware update before receiving compatibility with my Android 4.2.1. To Netgear’s credit, they continually improved the firmware until it finally functioned properly. You can watch video of it in action below:

On the downside, Miracast’s implementation in Netgear’s Push2TV device remains experimental. The most recent firmware update of my Nexus 4 broke compatibility with the Push2TV device. Also, simultaneous Bluetooth and wireless display doesn’t work; only one or the other functions at the same time. However, some custom ROMs permit both to function at the same time. Using a custom ROM, my Nexus 4 functioned briefly as a desktop alternative, pairing a Bluetooth wireless keyboard with a mouse. For the curious: You can read more about my attempts to turn my phone into a desktop-phone convergence device.

Wednesday, January 2, 2013

Don’t Have a False Sense of Security: 5 Insecure Ways to Secure Your Wi-Fi


rusty-broken-lock

You’ve got WEP encryption enabled, your network’s SSID is hidden, and you’ve enabled MAC address filtering so no one else can connect. Your Wi-Fi network is secure, right? Not really.
Good Wi-Fi security is simple: Enable WPA (ideally WPA2) and set a strong password. Other common tricks for increasing a Wi-Fi network’s security can easily be bypassed. They may deter more casual users, but a strong WPA2 password will deter everyone.
Image Credit: Nick Carter on Flickr

WEP Encryption

There are several different types of wireless network encryption, including WEP, WPA, and WPA2. Routers being sold today still ship with option to use WEP encryption – this may be necessary if you have very old devices that can’t use WPA.
WEP can be cracked very easily. WEP prevents people from directly connecting to the network, so it’s superior to using an open Wi-Fi network. However, anyone that wants access to your network can easily crack the WEP encryption and determine your network’s password.
Instead of using WEP, ensure you’re using WPA2. If you have old devices that only work with WEP and not WPA – such as the original Xbox or Nintendo DS – they’re probably due for an upgrade.

Hidden SSID

Many routers allow you to hide your wireless network’s SSID. However, wireless network names were never designed to be hidden. If you hide your SSID and connect to it manually, your computer will constantly be broadcasting the network’s name and looking for it. Even when you’re on the other side of your country, your laptop will have no idea if your network is nearby and it will continue trying to find it. These broadcasts will allow people nearby to determine your network’s SSID.
Tools for monitoring the wireless traffic in the air can easily detect “hidden” SSID names. SSID names aren’t passwords; they just tell your computers and other devices when they’re in range of your wireless network. Rely on a strong encryption instead of a hidden SSID.
We’ve busted this myth in the past. For more, read: Debunking Myths: Is Hiding Your Wireless SSID Really More Secure?

MAC Address Filtering

Every network interface has a unique ID known as a “Media Access Control address,” or MAC address. Your laptop, smartphone, tablet, game console – everything that supports Wi-Fi has its own MAC address. Your router probably displays a list of the MAC addresses connected and allows you to restrict access to your network by MAC address. You could connect all your devices to the network, enable MAC address filtering, and only allow the connected MAC addresses access.
However, this solution isn’t a silver bullet. People within range of your network can sniff your Wi-Fi traffic and view the MAC addresses of the computers connecting. They can then easily change their computer’s MAC address to an allowed MAC address and connect to your network – assuming they know its password.
MAC address filtering can provide some security benefits by making it more of a hassle to connect, but you shouldn’t rely on this alone. It also increases the hassles you’ll experience if you have guests over who want to use your wireless network. Strong WPA2 encryption is still your best bet.

Static IP Addressing

Another questionable security tip making the rounds is using static IP addresses. By default, routers provide an integrated DHCP server. When you connect a computer or any other device to your wireless network, the device asks the router for an IP address and the router’s DHCP server gives them one.
You could also disable the router’s DHCP server. Any device connecting to your wireless network wouldn’t automatically receive an IP address. You’d have to enter an IP address by hand on each device to use the network.
There’s no point in doing this. If someone can connect to the wireless network, it’s trivial for them to set a static IP address on their computer. In addition to being extremely ineffective, this will make connecting devices to the network more of a hassle.

Weak Passwords

Weak passwords are always a problem when it comes to computer security. If you’re using WPA2 encryption for your Wi-Fi network, you may think you’re safe – but you may not be.
If you’re using a weak password for your WPA2 encryption, it can easily be cracked. Passwords like “password”, “letmein” or “abc123” are just as bad as using WEP encryption – if not worse.
Don’t use the minimum password length of 8 characters. Something between 15 to 20 characters should probably be good, but you can go all the way up to 63 characters if you like. You can also create a longer password by using a “passphrase,” or password phrase – a sequence of words, like a sentence.

Wednesday, December 19, 2012

How to Access Your Router If You Forget the Password


router-header

Routers protect their web interfaces, where you can configure their networking, parental control, and port forwarding settings, with a username and password. These default passwords can be changed to protect the router’s settings.
If you’ve forgotten a router’s password – or if you acquired a used router and don’t know its password – there’s a way to reset the password. You may also be able to forward ports without knowing the password.
Image Credit: tnarik on Flickr

Find the Default Username and Password

Before resetting your router to its default settings, you should first try using the default username and password to log in. You’ll need these anyway if you plan on resetting the router to its factory default settings. There are several ways to find this information:
  • Read your router’s manual. Different models of routers – even ones from the same manufacturer – often have different username and password combinations. To locate the default username and password for the router, look in its manual. (If you’ve lost the manual, you can often find it by searching for your router’s model number and “manual” on Google. Or just search for your router’s model and “default password”.)
  • Look for a sticker on the router itself. Some routers – particularly ones that may have come from your Internet service provider – ship with unique passwords. These passwords may sometimes be printed on a sticker on the router itself.
  • Try a common username and password combination. Many routers use the password “admin”  (don’t type the quotes) and a blank username, a blank password and “admin” as the username, or “admin” as both the password and username. You can find a fairly comprehensive list of default usernames and passwords for various routers onRouterPasswords.com.
Try to log in with the default credentials after finding them – it’s possible the router was already reset or someone never changed its password. If they don’t work, continue to the next section – you’ll need the default credentials after resetting the router.

Reset the Router to Factory Defaults

Routers come with a button you can press to reset the router to its default factory settings. This resets any configuration changes you’ve made to the router – forwarded ports, network settings, parental controls, and custom passwords will all be wiped away. You’ll be able to access the router with its default username and password, but you may have to spend some time configuring the router again, depending on how many changes you made to its configuration.
The exact process (and location of the reset button) will vary from router to router. For best results, you should consult your router’s manual for any model-specific instructions. However, the process is generally very similar on most routers.
First, look at the back (or perhaps the bottom) of the router. You’ll see a special button labeled Reset. This button is often located in a depressed hole, known as a “pinhole,” so you can’t accidentally press it.
To reset the router, you’ll generally need to press this button and hold it down for about 10 seconds. After you release the button, the router will reset itself to the factory default settings and reboot. If the button is located in a pinhole, you’ll need to use a bent paperclip or another long, narrow object to press and hold it.
Once you’ve pressed the button down for long enough, you can log into the router with its default username and password.

How to Forward Ports Without Knowing the Password

Do you just want to open the router’s web interface and forward ports for a server, game, or other type of networked program? If so, you don’t necessarily even have to know the password. This trick is also useful if you’re using someone else’s network and don’t have access to the password.
This works because many routers support Universal Plug and Play (UPnP), which allows programs on your computer to “ask” the router to open ports for them. If UPnP is enabled on the router, it will automatically open the port.
If a program supports this option, you’ll generally find it in its connection settings alongside the port configuration. NAT-PMP, which you may also see, is a similar way of automatically forwarding ports that fewer routers support.
If you use a program that doesn’t include integrated support for UPnP, never fear – you can use a program like UPnP PortMapper to quickly forward ports from a desktop application. You can forward any ports you like.

Once you’ve reset the router’s settings, you can log in with the default username and password and change its password from its web interface.

Tuesday, October 16, 2012

The Difference Between .com, .net, .org and Why We’re About To See Many More Top-Level Domains


image

.com, .net, .org and other website suffixes are known as “top-level domains” (TLDs). While we normally see only a few of these, there are hundreds of them – and there may be thousands more soon.
Top-level domains are managed by the Internet Assigned Numbers Authority (IANA), which is run by the Internet Corporation for Assigned Names and Numbers (ICANN).

Generic Top-Level Domains

Perhaps the most common top-level domains are .com, .net, and .org. Originally, each had a unique purpose:
  • .com: Commercial (for-profit) websites
  • .net: Network-related domains
  • .org: Non-profit organizations
However, these top-level domains all offer open registration – anyone can register a .com, .net, or .org domain for a website (for a fee). The distinction between the domains has largely been lost, although there are still non-profit organizations that prefer .org.
There are a variety of other domains that were added later to take some off the stress off of the original generic top-level domains (gTLDs), including .biz and .info. However, fewer websites use these top-level domains – there’s more brand recognition associated with a .com domain. Currently, .com is by far the most popular top-level domain – nearly 50 percent of the websites Google visits use the .com top-level domain. (Source)

Open vs. Closed TLDs

In contrast to the above top-level domains, which are “open” in that they allow anyone to register a domain without meeting any qualifications, many TLDs are “closed.” For example, if you want to register a .museum, .aero, or .travel domain, you must verify that you’re a legitimate museum, air-travel, or tourism-related entity.

Country-Specific Top-Level Domains

There are hundreds of country-specific top-level domains. For example, the .uk domain is for the United Kingdom, the .ca domain is for Canada, and the .fr domain is for France.
Some of these country-specific domains are closed and only allow citizens and businesses in the country to register, while some allow open registration for everyone to register.
For example, the popular .ly domain, notably used by bit.ly and other URL-shortening services, is actually the country-specific domain for Libya. It allows largely open registration, although there are some restrictions around the type of content a website with a .ly TLD can contain.
Uniquely, the USA has some country-specific domains that aren’t country codes:
  • .edu: Educational institutions in the US
  • .gov: US government entities
  • .mil: US military use

Future Top-Level Domains

In 2012, ICANN allowed corporations to apply for new generic top-level domains. The list of applications is long – For example, Google applied for domains such as .google, .lol, .youtube, and .docs. Many companies applied for domains matching their company name, such as .mcdonalds and .apple. A variety of companies also made a land grab for generic domain names such as .pizza, .security, .download, and .beer.
None of these new domains has come online yet, but it seems like we’ll be seeing a lot more top-level domains soon.

Wednesday, October 10, 2012

How To Troubleshoot Internet Connection Problems


hand-plugging-in-ethernet-cable

Internet connection problems can be frustrating. Rather than mashing F5 and desperately trying to reload your favorite website when you experience a problem, here are some ways you can troubleshoot the problem and identify the cause.
Ensure you check the physical connections before getting too involved with troubleshooting. Someone could have accidentally kicked the router or modem’s power cable or pulled an Ethernet cable out of a socket, causing the problem.
Image Credit: photosteve101 on Flickr

Ping

One of the first things to try when your connection doesn’t seem to be working properly is the ping command. Open a Command Prompt window from your Start menu and run a command like ping google.com or ping howtogeek.com.
This command sends several packets to the address you specify. The web server responds to each packet it receives. In the command below, we can see that everything is working fine – there’s 0% packet loss and the time each packet takes is fairly low.
If you see packet loss (in other words, if the web server didn’t respond to one or more of the packets you sent), this can indicate a network problem. If the web server sometimes takes a much longer amount of time to respond to some of your other packets, this can also indicate a network problem. This problem can be with the website itself (unlikely if the same problem occurs on multiple websites), with your Internet service provider, or on your network (for example, a problem with your router).
Note that some websites never respond to pings. For example, ping microsoft.com will never results in any responses.

Problems With a Specific Website

If you’re experiencing issues accessing websites and ping seems to be working properly, it’s possible that one (or more) websites are experiencing problems on their end.
To check whether a website is working properly, you can use Down For Everyone Or Just For Me, a tool that tries to connect to websites and determine if they’re actually down or not. If this tool says the website is down for everyone, the problem is on the website’s end.
If this tool says the website is down for just you, that could indicate a number of things. It’s possible that there’s a problem between your computer and the path it takes to get to that website’s servers on the network. You can use the traceroute command (for example,tracert google.com) to trace the route packets take to get to the website’s address and see if there are any problems along the way. However, if there are problems, you can’t do much more than wait for them to be fixed.

Modem & Router Issues

If you are experiencing problems with a variety of websites, they may be caused by your modem or router. The modem is the device that communicates with your Internet service provider, while the router shares the connection among all the computers and other networked devices in your household. In some cases, the modem and router may be the same device.
Take a look at the router. If green lights are flashing on it, that’s normal and indicates network traffic. If you see a steady, blinking orange light, that generally indicates the problem. The same applies for the modem – a blinking orange light usually indicates a problem.
If the lights indicate that either devices are experiencing a problem, try unplugging them and plugging them back in. This is just like restarting your computer. You may also want to try this even if the lights are blinking normally – we’ve experienced flaky routers that occasionally needed to be reset, just like Windows computers. Bear in mind that it may take your modem a few minutes to reconnect to your Internet service provider.
If you still experience problems, you may need to perform a factory reset on your router or upgrade its firmware. To test whether the problem is really with your router or not, you can plug your computer’s Ethernet cable directly into your modem. If the connection now works properly, it’s clear that the router is causing you problems.

Issues With One Computer

If you’re only experiencing network problems on one computer on your network, it’s likely that there’s a software problem with the computer. The problem could be caused by a virus or some sort of malware or an issue with a specific browser.
Do an antivirus scan on the computer and try installing a different browser and accessing that website in the other browser. There are lots of other software problems that could be the cause, including a misconfigured firewall.

DNS Server Problems

When you try to access Google.com, your computer contacts its DNS server and asks for Google.com’s IP address. The default DNS servers your network uses are provided by your Internet service provider, and they may sometimes experience problems.
You can try accessing a website at its IP address directly, which bypasses the DNS server. For example, plug this address into your web browser’s address bar to visit Google directly:
If the IP address method works but you still can’t access google.com, it’s a problem with your DNS servers. Rather than wait for your Internet service provider to fix the problem, you can try using a third-party DNS server like OpenDNS or Google Public DNS.

Ultimately, most connection problems you’ll run into are probably someone else’s problem – you can’t necessarily solve them yourself. Often, the only thing you can do is wait for your Internet service provider or a specific website to fix the problem you’re experiencing. (However, restarting a flaky router can solve lots of problems.)
If you are experiencing problems, you can always try calling your Internet service provider on the phone – you’re paying them for this service, after all. They will also be able to tell you whether it’s a problem that other users are also having — or whether it’s a problem on your end.

Thursday, August 30, 2012

What is DNS?


image

Did you know you could be connected to facebook.com – and see facebook.com in your web browser’s address bar – while not actually being connected to Facebook’s real website? To understand why, you’ll need to know a bit about DNS.
DNS underpins the world wide web we use every day. It works transparently in the background, converting human-readable website names into computer-readable numerical IP addresses.
Image Credit: Jemimus on Flickr

Domain Names and IP Addresses

DNS stands for “domain name system.” Domain names are the human-readable website addresses we use every day. For example, Google’s domain name is google.com. If you want to visit Google, you just need to enter google.com into your web browser’s address bar.
However, your computer doesn’t understand where “google.com” is. Behind the scenes, the Internet and other networks use numerical IP addresses (“Internet protocol” addresses). Google.com is located at the IP address 173.194.39.78 on the Internet. If you typed this number into your web browser’s address bar, you’d also end up at Google’s website.
We use google.com instead of 173.194.39.78 because addresses like google.com are more meaningful and easier for us to remember. DNS is often explained as being like a phone book – like a phone book, DNS matches human-readable names to numbers that machines can more easily understand.

DNS Servers

Domain name system servers match domain names like google.com to their associated IP addresses — 173.194.39.78 in the case of google.com. When you type google.com into your web browser’s address bar, your computer contacts your current DNS server and asks what IP address is associated with google.com. Your computer then connects to the IP address and displays “google.com” in your web browser – the connection to 173.194.39.78 happens behind the scenes.
The DNS servers you use are likely provided by your Internet service provider (“ISP”). If you’re behind a router, your computer is likely using your router as your DNS server, but the router is likely forwarding requests to your Internet service provider’s DNS servers.
Computers cache DNS responses, so the DNS request doesn’t happen each time you connect to google.com. Once your computer has determined the IP address associated with a domain name, it will remember that for a period of time – this improves connection speed by skipping the DNS request phase. Your computer just needs to connect to Google, not its DNS server and then Google.

Security Concerns

Some viruses and other malware programs change your default DNS server to a DNS server run by a malicious organization or scammer. This malicious DNS server can point popular websites to different IP addresses, which could be run by scammers.
For example, when you connect to facebook.com while using your Internet service provider’s legitimate DNS server, the DNS server will respond with the actual IP address of Facebook’s servers.
However, if your computer or network is pointed at a malicious DNS server set up by a scammer, the malicious DNS server could respond with a different IP address entirely. In this way, it’s possible that you could see “facebook.com” in your web browser’s address bar, but you may not actually be at the real facebook.com – behind the scenes, the malicious DNS server has pointed you to a different IP address.
To avoid this problem, ensure you’re running antivirus software. You should also watch for certificate error messages on encrypted (HTTPS) websites. For example, if you try to connect to your bank’s website and see an “invalid certificate” message, this could be a sign that you’re using a malicious DNS server that’s pointing you to a fake website, which is only pretending to be your bank.
Malware can also use your computer’s hosts file to override your DNS server and point certain domain names (websites) at other IP addresses. For this reason, Windows 8 prevents users from pointing facebook.com and other popular domain names to different IP addresses by default.

Why You Might Want To Use Third-Party DNS Servers

As we’ve established above, you’re probably using your Internet service provider’s default DNS servers. However, you don’t have to – you can use DNS servers run by a third party instead of your default DNS servers. Two of the most popular third-party DNS servers areOpenDNS and Google Public DNS.
In some cases, these DNS servers may provide you with faster DNS resolves, speeding up your connection the first time you connect to a domain name. However, the actual speed differences you see will vary depending on how far you are from the third-party DNS servers and how fast your ISP’s DNS servers are. If your ISP’s DNS servers are fast and you’re located a long way from OpenDNS or Google DNS’s servers, you may see slower DNS resolves with a third-party DNS server.
OpenDNS also provides optional website filtering. For example, if you enable the filtering, accessing a pornographic website from your network could result in a “Blocked” page appearing instead of the pornographic website. Behind the scenes, OpenDNS has returned the IP address of a website with a “Blocked” messsage instead of the IP address of the pornographic website – this takes advantage of the way DNS works to block websites.
For information on using Google Public DNS or OpenDNS, check out the following articles:

Thursday, August 23, 2012

How To Change Your DNS Servers & Improve Internet Security


how to change dnsImagine this – you wake up one beautiful morning, pour yourself a cup of coffee, and then sit down at your computer to get started with your work for the day. Before you actually get stuff done, you go over to your favorite browser and type in http://www.makeuseof.com. Within seconds, you’re looking at our website and all of our latest posts.
But hold on, how the heck did your computer even know where to find MakeUseOf? How does it even know what http://www.makeuseof.com even means? It finds out by using a core technology which exists throughout the Internet called DNS, or Domain Name System.

Tell Me More About DNS!

DNS is a backbone component of the Internet which helps in name resolution. In layman’s terms, DNS helps turn a web address, also known as a URL, like http://www.makeuseof.com into an actual location, called an IP address. IP addresses are in the form xxx.xxx.xxx.xxx, where all the x’s are a bunch of different numbers. Your computer knows how to reach those IP addresses, but it doesn’t directly know what to make out of URLs, which were created to make it easier to remember websites. DNS servers are there to help with this so that we can browse without having to think about what’s actually happening.
The thing is, there isn’t a single, central DNS server which everyone has to access in order to resolve a URL. There are many, many different DNS servers in the world, which can be found at places such as your ISP or third-party services such as OpenDNS. In fact, you’re most likely using your ISP’s DNS servers right now if you haven’t changed any of your computer’s or router’s settings. Although you’d like to trust your ISP, their servers are most likely simple. Simple in that they literally only resolve URLs, and nothing more. They usually don’t focus on increasing security, because these servers can be at risk of cyber attacks as well.

Possible Results Of An Attack

how to change dns
When a DNS server is attacked, there’s a few different things that could happen. First, the server could just simply crash or otherwise go offline, so you won’t be able to browse around as you would normally do until your ISP fixes the issue. Second, the attacker could change DNS records on the server, and point certain URLs to false lookalike pages. This is an especially dangerous attack because phishing attacks are usually recognizable by a weird URL, but with a tainted DNS server, the URL will appear exactly what it should be, but you’d still be on the false page.

What Can I Do?

Therefore, the best safety practice is to switch to a more secure DNS server which is better supported. There’s a good number of DNS services you can choose from, but there are two I highly recommend. If you want a no-gimmick DNS experience that you can trust, you should try Google’s Public DNS servers. These are run by the search giant itself and are highly maintained, so you won’t have to worry about any issues or attacks. For a more feature-rich DNS experience, I’d recommend OpenDNS, which has special options to prevent certain types of attacks and even includes a customizable web filter.

How Do I Switch?

how to change dns
Once you’ve settled on the DNS server you’d like to switch to, you’ll need to change your system’s settings in order to use them. The methods of changing these settings vary greatly depending on the operating system.
  • Windows users will need to go into their network device’s properties, then go into the IPv4 properties, and then change the DNS servers in the bottom section of the window.
  • Mac OS X users will need to go into their System Preferences, click on “Network“, choose their network device, click on “Advanced”, and then enter DNS servers after clicking on the DNS tab.
  • Linux users will need to click on their network applet, choose Edit Connections, click on “Edit” for your network device, and under the “IPv4 Settings” tab, choose the “Automatic (DHCP) addresses only” profile, and then add the DNS servers into the DNS servers textbox, with each server address separated by a comma.
  • Even Android users can change their DNS server, but it only goes into effect while you’re using WiFi. Therefore, you can find the appropriate settings when you hit the Menu button and choose “Advanced” while you’re in the WiFi setup screen. For quick reference, Google’s DNS servers are at the addresses 8.8.8.8 and 8.8.4.4, while OpenDNS’s servers are at 208.67.222.222 and 208.67.220.220.

Conclusion

Issues that can exist with DNS servers are a bigger issue than a lot of people think, because rarely anyone ever talks about them and mentions switching to different ones. Plus it’s a “confusing” backbone component of the Internet, which makes people even more reluctant to talk about it. Consider switching as a precaution so you know you’ll be safe.
Which DNS server(s) are you using? What made you choose it over other options? Let us know in the comments!

Sunday, July 22, 2012

Why The Internet Is Running Out of IPv4 Addresses and Why IPv6 Is Important


IPv4 addresses on the public Internet are running low. Microsoft paid $7.5 million for Nortel’s 666,624 IP addresses when Nortel went bankrupt in 2011 – that’s over $8 an IP address. IPv4 has technical problems, and IPv6 is the solution.
Unfortunately, deployment of IPv6 has been put off for too long. Had IPv6 been implemented years ago, the transition from the older standard to the newer one would have gone much more smoothly.
Image Credit: Bob Mical on Flickr

Technical Problems with IPv4

In 1980, Internet Protocol version 4 addresses were defined as 32-bit numbers. This provided a total of 232 IPv4 addresses – that’s 4 294 967 296, or 4.2 billion, addresses. This may have seemed like a lot of addresses back in 1980, but today there are many more than 4.2 billion network-connected devices on the planet. Of course, the number of devices connected to the Internet will only continue to grow. To make matters worse, some of these IPv4 addresses are reserved for special cases, so the Internet has fewer than 4.2 billion publically routable IPv4 addresses available to it.
There aren’t anywhere near enough publically routable addresses available for every device on the Internet to have a unique one. One thing that’s helped is network-address translation (NAT), which most home networks use. If you have a router in your home, it takes a single publically routable IP address from your Internet service provider and shares it amongst the networked devices in your home. To share the single IPv4 address, it creates a local area network, and each networked device behind the router has its own local IP address. This creates problems when running server software and requires more complicated port forwarding.
Carrier-grade NAT is one solution – essentially, every computer using an Internet service provider would be on a local network specific to that ISP. The ISP itself would implement network-address translation, just like a home router. Individuals wouldn’t have publically routable IP addresses and running some forms of server software that requires incoming connections wouldn’t be possible.
Image Credit: Jemimus on Flickr

How IPv6 Solves the Problems

To avoid the future exhaustion of IPv4 addresses, IPv6 was developed in 1995. IPv6 addresses are defined as 128-bit numbers, which means there are a maximum of 2128possible IPv6 addresses. In other words, there are over 3.402 × 1038 IPv6 addresses – a much larger number.
In addition to solving the IPv4 address depletion problem by providing more than enough addresses, this large number offers additional advantages – every device could have a globally routable public IP address on the Internet, eliminating the complexity of configuring NAT.
Image Credit: Justin Marty on Flickr

So What’s the Hold Up?

IPv6 was finalized in 1998, 14 years ago. You might assume that this problem should have been solved long ago – but this isn’t the case. Deployment has been going very slowly, in spite of how long IPv6 has been around. Some software is still not IPv6 compatible, although much software has been updated. Some network hardware may also not be IPv6 compatible – while manufacturers could release firmware updates, many of them would rather sell new, IPv6-ready hardware instead. Some websites still do not have IPv6 addresses or DNS records, and are only reachable at IPv4 addresses.
Given the need to test and update software and replace hardware, IPv6 deployment has not been a priority for many organizations. With enough IPv4 address space available, it’s been easy to put IPv6 deployment off until the future. With the imminent exhaustion of available IPv4 addresses, this concern has become more pressing. Deployment is ongoing, with “dual-stack” deployment easing the transition – modern operating systems can have both IPv4 and IPv6 addresses at the same time, making deployment smoother.

Thursday, July 5, 2012

VPN vs. SSH Tunnel: Which Is More Secure?


image

VPNs and SSH tunnels can both securely “tunnel” network traffic over an encrypted connection. They’re similar in some ways, but different in others – if you’re trying to decide which to use, it helps to understand how each works.
An SSH tunnel is often referred to as a “poor man’s VPN” because it can provide some of the same features as a VPN without the more complicated server setup process – however, it has some limitations.

How a VPN Works

VPN stands for “virtual private network,” – as its name indicates, it’s used for connecting to private networks over public networks, such as the Internet. In a common VPN use case, a business may have a private network with file shares, networked printers, and other important things on it. Some of the business’s employees may travel and frequently need to access these resources from the road. However, the business doesn’t want to expose their important resources to the public Internet. Instead, the business can set up a VPN server and employees on the road can connect to the company’s VPN. Once an employee is connected, their computer appears to be part of the business’s private network – they can access file shares and other network resources as if they were actually on the physical network.
The VPN client communicates over the public Internet and sends the computer’s network traffic through the encrypted connection to the VPN server. The encryption provides a secure connection, which means the business’s competitors can’t snoop on the connection and see sensitive business information. Depending on the VPN, all the computer’s network traffic may be sent over the VPN – or only some of it may (generally, however, all network traffic goes through the VPN). If all web browsing traffic is sent over the VPN, people between the VPN client and server can’t snoop on the web browsing traffic. This provides protection when using public Wi-Fi networks and allows users to access geographically-restricted services – for example, the employee could bypass Internet censorship if they’re working from a country that censors the web. To the websites the employee accesses through the VPN, the web browsing traffic would appear to be coming from the VPN server.
Crucially, a VPN works more at the operating system level than the application level. In other words, when you’ve set up a VPN connection, your operating system can route all network traffic through it from all applications (although this can vary from VPN to VPN, depending on how the VPN is configured). You don’t have to configure each individual application.

How an SSH Tunnel Works

SSH, which stands for “secure shell,” isn’t designed solely for forwarding network traffic. Generally, SSH is used to securely acquire and use a remote terminal session – but SSH has other uses. SSH also uses strong encryption, and you can set your SSH client to act as a SOCKS proxy. Once you have, you can configure applications on your computer – such as your web browser – to use the SOCKS proxy. The traffic enters the SOCKS proxy running on your local system and the SSH client forwards it through the SSH connection – this is known as SSH tunneling. This works similarly to browsing the web over a VPN – from the web server’s perspective, your traffic appears to be coming from the SSH server. The traffic between your computer and the SSH server is encrypted, so you can browse over an encrypted connection as you could with a VPN.
However, an SSH tunnel doesn’t offer all the benefits of a VPN. Unlike with a VPN, you must configure each application to use the SSH tunnel’s proxy. With a VPN, you’re assured that all traffic will be sent through the VPN – but you don’t have this assurance with an SSH tunnel. With a VPN, your operating system will behave as though you’re on the remote network – which means connecting to Windows networked file shares would be easy. It’s considerably more difficult with an SSH tunnel.
For more information about SSH tunnels, see this guide to creating an SSH tunnel on Windows with PuTTY. To create an SSH tunnel on Linux, see our list of cool things you can do with an SSH server.

Which Is More Secure?

If you’re worried about which is more secure for business use, the answer is clearly a VPN — you can force all network traffic on the system through it. However, if you just want an encrypted connection to browse the web with from public Wi-Fi networks in coffee shops and airports, a VPN and SSH server both have strong encryption that will serve you well.
There are other considerations, too. Novice users can easily connect to a VPN, but setting up a VPN server is a more complex process. SSH tunnels are more daunting to novice users, but setting up an SSH server is simpler – in fact, many people will already have an SSH server that they access remotely. If you already have access to an SSH server, it’s much easier to use it as an SSH tunnel than it is to set up a VPN server. For this reason, SSH tunnels have been dubbed a “poor man’s VPN.”
Businesses looking for more robust networking will want to invest in a VPN. On the other hand, if you’re a geek with access to an SSH server, an SSH tunnel is an easy way to encrypt and tunnel network traffic – and the encryption is just as good as a VPN’s encryption.