Wednesday, March 20, 2013

PSSP Is A Full-Featured PSP Emulator For iPhone


Some people argue that handheld gaming devices don’t have much of a future due to the constant progress smartphones are making. There can be no denying the fact that modern smartphones offer a huge variety of titles, but those who prefer quality over quantity still go for the likes of PlayStation Portable or Nintendo 3DS. A lot of people are sure to appreciate a way of combining the positive points of smartphones and handheld gaming devices. PPSSPP doesn’t exactly do that, but it comes pretty close. This PSP emulator has been around on Android and Windows for quite a while now, but has just arrived on iOS. As you can imagine, the app is available as a Cydia download, since Apple isn’t likely to allow such a thing to appear in the App Store. PPSSPP can be deemed a work in progress, but some PSP games that are fully compatible with it look pretty awesome on the iPhone.

Installation

PPSSPP isn’t available at any of the default repositories yet, and you will have to add the following repo to Cydia in order to install it.
http://cydia.myrepospace.com/theavenger
Once the resources have been refreshed properly, search for PPSSPP. Now you can install the emulator just like any other Cydia app.

Using PPSSPP

To get started, dump a PSP game onto the memory card to make an ISO out of it. You can look around on the internet for instructions; the process isn’t as complicated as it sounds, as long as you have the UMD of the game you want to play on your iPhone.
Once the ISO has been extracted, you need to copy it to your iDevice’s file system using WinSCP or iFile. The game needs to be placed at the following location.
/var/mobile/Documents/Download
Now you are all set to play your favorite PSP game on your iPhone.
PPSSPP iOS Home PPSSPP iOS Settings
Launch the app and adjust its settings to suit your requirements. From the emulator’s settings, it is possible to toggle sound, tinker with control options and change other visual aspects of the screen. As warned by the developer, changing some of the settings might cause your device to restart.
PPSSPP iOS Load PPSSPP iOS Game
Once the settings are all good to go, it’s time to load the game you copied to your device earlier. Hit the ‘Load’ button from the app’s home screen, and make your way to the game’s location in the file system where you placed the ISO file. Tap the file’s name, and watch PPSSPP work its magic. If you have an old iDevice, loading a game is likely going to take ages. The smoothness of the entire operation also depends upon the game you choose; not all games are compatible with PPSSPP for now, but the official site of the emulator has a complete list of games that play nice with the app.
The default controls in PPSSPP include four arrow keys, start/select buttons, four option keys, a button to bring up developer options and right/left joystick fire keys.
PPSSPP is a free and open-source app; do give it a try if you are a fan of PSP and want to see how it will look on your iPhone or iPod touch’s screen.

Eclipse Navigation Shortcuts


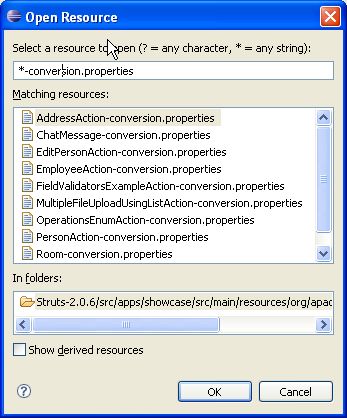
  • Open any file quickly without browsing for it in the Package ExplorerCtrl + Shift + R. This shortcut opens a dialog box that accepts the name of the file you’re looking for. It even accepts wildcard characters, yo. Typing *-conversion.properties will give you the list of all files that ends with -conversion.properties. So everytime you want to open a file–stop that hand from going to the mouse, and press Ctrl + Shift + R instead!
Opening a resource in Eclipse
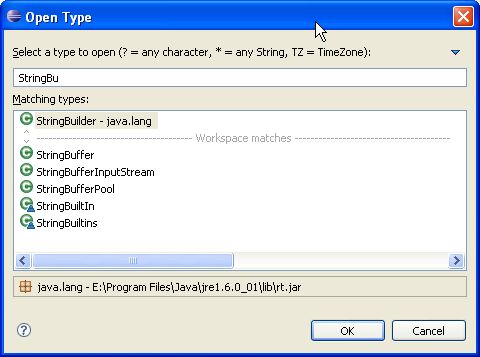
  • Open a type (e.g.: a class, an interface) without clicking through interminable list of packagesCtrl + Shift + T. If what you want is a Java type, this shortcut will do the trick. Unlike the previous shortcut, this even works when you don’t have the Java source file in your workspace (e.g.: when you’re opening a type from the JDK).
Opening a type in Eclipse
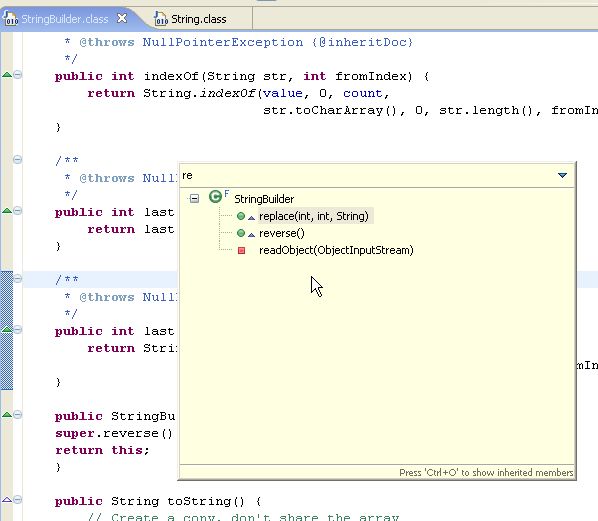
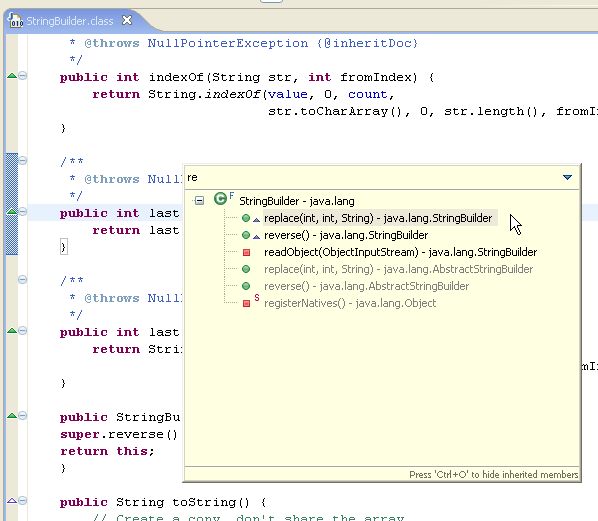
  • Go directly to a member (method, variable) of a huge class file, especially when a lot of methods are named similarlyCtrl + O. Say, you’re browsing through a file which has 500+ lines of code. How do you look for a method? Don’t use Ctrl + F and then type the method name. Use Ctrl + O, which gives you a list of candidates that match what you’ve typed so far. Select the member you want using the arrow keys, and press Enter. (Alternatively, if you just want to jump from one member to the next (or previous), you can use Ctrl + Shift + ↓ or Ctrl + Shift + ↑, respectively.) UPDATE: As Nick pointed out in the comments section, pressing Ctrl + O again shows the inherited members. Thanks Nick! :)
Browse Member
ctrl_o_2.jpg
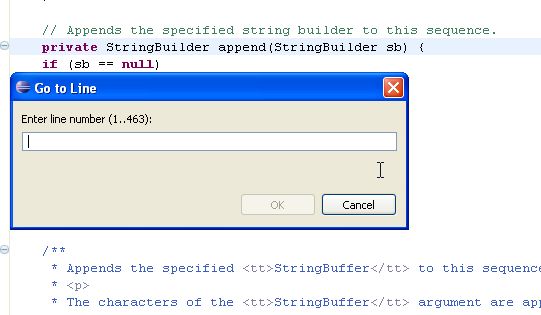
  • Go to line number N in the source fileCtrl + L, enter line number. Of course if the stack trace is in the Eclipse console, you can just click the hyperlink. But if it’s in a log file or something, just use this shortcut to go to the line in a jiffy.
Go to a line number
  • Go to the last edit locationCtrl + Q for . If you have a big file, it’s annoying to jump from one location in line 1000+ to 2000+ only to realize after looking at line 2017 that you’ve made a mistake in that location near line 1000+ just now. This shortcut brings you right to where you last edited a file. Very handy in a big file. Gone are the days of “let’s see… where did I edit it again… nope, nope… ah there it is”. (This even works when you’re already looking at a different file.)
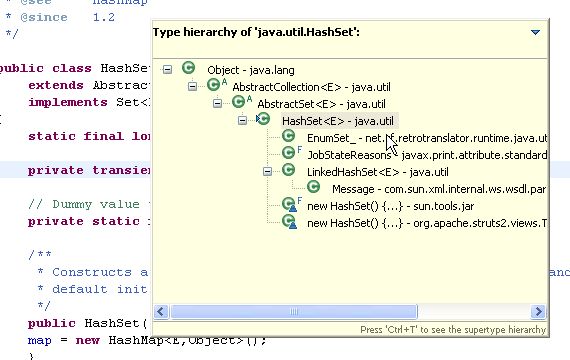
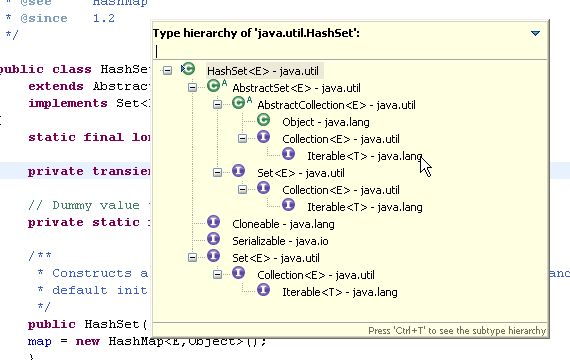
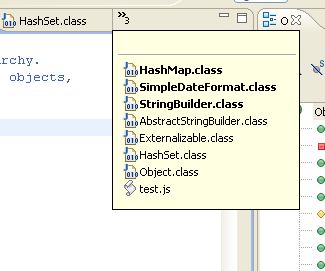
  • Go to a supertype/subtypeCtrl + T. Before I found this, if I want to go to the superclass of a class, I’d go the the very top of the file, hover my mouse over its superclass, hold Ctrl, and click. Disgusting. Now I just press Ctrl + T and I get this dialog below, which toggles between supertypes and subtypes when you press Ctrl + T again.
Subtype hierarchy view
Supertype hierarchy view
  • Go to other open editorsCtrl + E. I know you can cycle through the editors using Ctrl + F6 as well, but I prefer Ctrl + E because Ctrl + F6 has this annoying behaviour of requiring you to keep the Ctrl key down, and the distance between Ctrl and F6 is so far I have to twist my left hand to do that. Just press Ctrl + E, and either use the arrow buttons, or type the name of the file you’re editing.
Open editor
  • Move to one problem (i.e.: error, warning) to the next (or previous) in a fileCtrl + . for next, and Ctrl + ,for previous problem. No need to lift your hands off the keyboard to click on that red or yellow stripe.
  • Hop back and forth through the files you have visitedAlt + ← and Alt + →, respectively. I have to admit I don’t find myself using these two often, though.
  • Go to a type declarationF3. Alternatively, you can hold Ctrl down and click the hyperlinkedvariable or class or whatever it is the declaration of which you want to see–but why lift your hand off the keyboard? Just press F3 and Eclipse will bring you to the declaration of whatever is at the cursor at that moment.
OK, that’s it for this post. There are tons of other Eclipse shortcuts not covered by this article. To see the whole list, just open up your Eclipse (I’m assuming Eclipse 3.2 here–in older or more recent versions this may differ slightly), go to Help → Help Contents → Java Development User Guide → Reference → Menus and Actions. The whole motherload is there, from generating comments, correcting indentations, surrounding with, and so on.
The point I’m trying to get across is: Eclipse has a LOT of shortcuts to make things real easy for you. Java (or heck, any software) development is hard. We shouldn’t make it harder on ourselves by fighting our tools! Let our tools help us as much as possible, so we all can go back on the dot and spend more time with our family, lovers, or whatever it is we want to spend more time on. There’s no honour in working hard inefficiently. Only disgrace.

Tuesday, March 19, 2013

Introduction to Android Development


Introduction to Android Development [Re-Post]


Introduction to Android Development
Flash Video | ~781 kb/s | 1280x720 | Duration: 5 hours 3 mins | English: MP3, 118 kb/s (2 ch) | 1.77 GB
Genre: Development / Programming


In this series Donn Felker will walk through all the necessary steps to building and launching a sophisticated Android application.


Lessons:
1 - Introduction to Android Development

In this episode Donn covers the basics of the Android platform and the features common to Android devices. Donn shows a simple Hello World app and also walks through the steps to get your system setup and ready for Android Development.
2 - Android Architecture

In this episode Donn covers the basics of the Android system architecture which is very important and useful to understand before developing your first Android application.
3 - Building the UI

In this episode Donn gets started building the UI for the TekPub Android application that will be the focus of the remainder of this series.
4 - UI Explained Pt 1

In this episode Donn digs into creating the UI for TekPub Android application, he talks about using the designer, using the free program Droid Draw, and also creating the XML from scratch.
5 - UI Explained Pt 2

In this episode Donn continues building the UI for our TekPub application.
6 - Consuming a JSON API

In this episode Donn walks through consuming a JSON API from your Android application.
7 - Consuming a JSON API Pt. 2

In this episode Donn finishes connecting the TekPub app with the JSON API including using the Async task and showing loading dialogs.
8 - Introducing Roboguice

In this episode Donn shows how to use and integrate Roboguice - a dependency injection and IOC container for Android.

Introduction to Android Development [Re-Post]

Introduction to Android Development [Re-Post]


Download Links

http://www.secureupload.eu/1w0tl9e0ci5u/Int_to_An_Dev.part1.rar
http://www.secureupload.eu/lkh5jdvptmfp/Int_to_An_Dev.part2.rar

http://uploaded.net/file/u4fqu7fl/Int_to_An_Dev.part1.rar
http://uploaded.net/file/7l5dwzcq/Int_to_An_Dev.part2.rar

Android App Development and Design


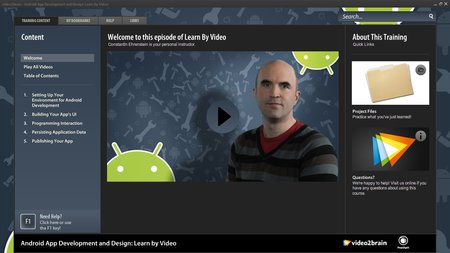
Android App Development and Design: Learn by Video

Android App Development and Design: Learn by Video
English | 2011 | iso | flv | 3 hrs 50 min | 1.02 GB
eLearning


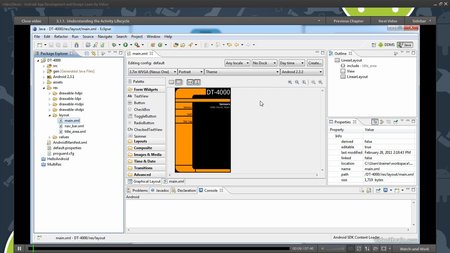
This innovative product uses interactive video to give developer/designers a solid understanding of how to design apps that can run on many different Android-based devices, under Android versions up to 2.3. Users will learn to set up an Android development environment, define device emulators, and connect to actual Android devices. The video also explains the fundamentals of Android layouts and user interfaces. It introduces the process of programming an app's interaction with Activities and Services and explains how to access existing Android system components. It also looks at how to ensure that an app runs on as many Android devices, screen sizes, and form factors as possible. It also explains how to package an app and publish it to the Android Marketplace.

Experienced instructor Constantin Ehrenstein presents five hours of exceptional quality video tutorials, complete with lesson files, assessment quizzes, and review materials. The video is wrapped in a unique interface that allows the viewer to jump to any topic and also bookmark individual sections for later review. The unique Watch-and-Work mode shrinks the video into a small window to allow the student to work alongside the video. Project files used in the lessons are included on the disc so viewers can practice what they've learned, and interactive review questions help reinforce freshly gained knowledge.

If you want to get in on the rapidly expanding market for Android apps, you’ll need to understand the important concepts behind Android development, which may not be intuitive for those familiar with other platforms. In this course from expert programmer and developer Constantin Ehrenstein, you’ll begin by stepping through the process of setting up your Android development environment, defining device emulators, and connecting to actual Android devices. Next, you’ll learn about the fundamentals of Android layouts and UIs and how to program your app’s interaction with activities and services. With your basic Android app fleshed out, you’ll learn how to broaden your app’s target audience by making it run on as many devices, screen sizes, and form factors as possible. And finally, you’ll learn how to package your app and publish it to the Android Market. This Learn by Video workshop is published in partnership with Peachpit Press.

Trainer: Constantin Ehrenstein

Android App Development and Design: Learn by Video

Android App Development and Design: Learn by Video


Download Links

http://www.secureupload.eu/63ea3o0imlw3/Peachpit_Press_-_Android_App_Development_and_Design_Learn_by_Video.part1.rar
http://www.secureupload.eu/ygsq60n4mwtk/Peachpit_Press_-_Android_App_Development_and_Design_Learn_by_Video.part2.rar

http://uploaded.net/file/9hwqb9jm/Peachpit%20Press%20-%20Android%20App%20Development%20and%20Design_Learn%20by%20Video.part1.rar
http://uploaded.net/file/unrwwdw0/Peachpit%20Press%20-%20Android%20App%20Development%20and%20Design_Learn%20by%20Video.part2.rar

Watch TV Online For Free


Yes, You CAN Watch TV Online Legally & For Free

by Chris Hoffman
watch tv online
Whether you're thinking of cutting the cord or just want to watch TV on your own schedule instead of the television network's, there are more legal ways to watch TV online than ever. Even better, many of these legal options are free. Most of these websites will expose you to commercials - someone has to pay for the free TV - but you'll end up watching commercials if you pay to watch TV the traditional way, anyway.
Many of these services are only available in specific countries, such as the USA. Some services are only available in the UK, so even Americans can't watch everything. If you're one of the majority of human beings living outside these two countries, never fear - we've covered easy ways you can get access to region-blocked media services, wherever you live.

HitBliss

HitBliss is a new service. It's a sort of store you can purchase TV shows and movies from, just like Apple's iTunes. However, you can also watch targeted ads and receive credit you can put towards watching streaming TV shows and movies. Watching two minutes of ads gives you roughly enough credit to pay for a TV show episodes, so HitBliss appears to have fewer advertisements than traditional television.
watch tv online

Hulu

Hulu is well-known in the USA as a popular way to watch recent TV shows. Unlike services like Netflix, Hulu offers recent TV episodes from currently airing seasons. You'll have to pay for a Hulu Plus subscription to watch some shows - and older seasons of shows - but Hulu Plus also offers a week-long free trial where you can watch TV online - everything for free.
watch tv free online

Television Network & Show Websites

Every television network has its own website, and many networks offer recent episodes for free streaming. For example, you can find recent episodes of The Office on NBC's website for The Office. The Daily Show and Colbert Report offer full shows on their own websites, too. These only work on the USA - in other countries, you'll need to use the appropriate television network's website.
For example, The Office airs on Global TV instead of NBC in Canada, so you'd need to use Global TV's website for The Office in Canada, not NBC's website for The Office.
This can be a bit complicated, and individual episodes can be hard to find as shows are scattered across websites and networks, but you'll often find recent episodes for many shows on their official website for your country.
watch tv free online

Netflix/Lovefilm/Amazon Free Trials

NetflixLovefilm (in the UK), and Amazon Prime Instant Video are all popular ways of watching TV shows online, but they're not free. However, it's easy to forget that Netflix, Lovefilm, and Amazon all offer free trials you can enjoy for 30 days. On Amazon, you'll need to opt into the free trial of Amazon Prime to get access to the free-with-Prime Amazon Instant Video catalog.
At the end of the 30 day period, you can cancel your subscription if you don't want to pay for the service.
watch tv free online

Crackle

Sony's Crackle offers a limited catalog of TV shows (and movies) for completely free streaming. To get all of its content, you'll have to be in the USA, although some of its catalog is also available in the UK, Canada, and Australia. Like many services, Crackle offers a mobile app.
In the US, Crackle offers Seinfeld, Dilbert, and a variety of other shows and movies. Only 9 episodes of Seinfeld are available at the moment, so that should give you some idea of Crackle's limitations.
watch tv shows online

YouTube

YouTube is a common destination for people looking for free TV shows online. You can find lots of free TV shows on YouTube. But let's be honest - most free TV shows on YouTube are put up by users and not officially sanctioned. However, sometimes television networks put up free TV show episodes on YouTube.
YouTube offers a YouTube TV Shows page where you can watch TV online - watching shows that have been put up on YouTube legitimately. Sometimes TV networks may put up episodes of their own TV shows on their own YouTube channels, as HBO did for a limited time with the first episodes of some of its new series. Selection will vary by country, as with the other services here.
watch tv shows online

Livestation

Livestation offers video streams of live TV news networks. They're completely legitimate and approved video streams, too. You'll find a lot of big news networks here, including BBC World News, CNN International, Bloomberg, Sky News, and Al Jazeera English. Some of the networks, like BBC World News, require a subscription, but many are free. Unlike many other services, Livestation appears to work in all countries without any region-blocking.
We've previously taken a look at other websites where you can watch news at online, including Livestation.
watch tv shows online

BBC iPlayer

BBC iPlayer offers a variety of BBC television shows for free in the UK, including the popular Doctor Who series. As with other services on this list, international users can get in on the action, too.
watch tv online

TVCatchup

TVCatchup is a free service for people living in the UK. It allows you to watch over 50 channels of live television from your computer, phone, or tablet. It doesn't offer individual episodes on-demand, but live streams of the networks.
watch tv online
If you're willing to consider a paid service, check out our comparison of the best streaming media services to figure out which one is worth your hard-earned money.
Where else do you get your free television show fix and watch TV online? Share any other free (and legitimate) services in the comments!

Sunday, March 17, 2013

How to Start Using the Linux Terminal


linux-terminal-on-ubuntu

Whether you’re a new Linux user or you’ve been using Linux for a while, we’ll help you get started with the terminal. The terminal isn’t something you should be scared of – it’s a powerful tool with lots of uses.
You can’t learn everything you need to know about the terminal by reading a single article. It takes experience playing with the terminal firsthand. We hope this introduction helps you get to grips with the basics so you can continue learning more.

Basic Terminal Usage

Launch a terminal from your desktop’s application menu and you will see the bash shell. There are other shells, but most Linux distributions use bash by default.
You can launch a program by typing its name at the prompt. Everything you launch here – from graphical applications like Firefox to command-line utilities – is a program. (Bash actually has a few built-in commands for basic file management and such, but those function like programs, too.) Unlike on Windows, you don’t have to type the full path to a program to launch it. For example, let’s say you wanted to open Firefox. On Windows, you’d need to type the full path to Firefox’s .exe file. On Linux, you can just type:
firefox
Press Enter after typing a command to run it. Note that you don’t need to add an .exe or anything like that – programs don’t have file extensions on Linux.
Terminal commands can also accept arguments. The types of arguments you can use depends on the program. For example, Firefox accepts web addresses as arguments. To launch Firefox and open How-to Geek, you could run the following command:
firefox howtogeek.com
Other commands you would run in the terminal function just like Firefox, except many run only in the terminal and don’t open any sort of graphical application window.

Installing Software

One of the most efficient things to do from the terminal is install software. Software management applications like the Ubuntu Software Center are fancy frontends to the few terminal commands they use in the background. Instead of clicking around and selecting applications one-by-one, you can install them with a terminal command. You even even install multiple applications with a single command.
On Ubuntu (other distributions have their own package management systems), the command to install a new software package is:
sudo apt-get install packagename
This may seem a bit complicated, but it’s working just like the Firefox command above. The above line launches sudo, which asks for your password before launching apt-get with root (administrator) privileges. The apt-get program reads the arguments install packagenameand installs a package named packagename.
However, you can also specify multiple packages as arguments. For example, to install the Chromium web browser and Pidgin instant messenger, you could execute this command:
sudo apt-get install chromium-browser pidgin
If you just installed Ubuntu and wanted to install all your favorite software, you could do it with a single command like the above one. You would just need to know the package names of your favorite programs, and you can guess them fairly easily. You can also refine your guesses with the aid of the tab completion trick below.
For more in-depth instructions, read How to Install Programs in Ubuntu in the Command-Line.

Working With Directories and Files

The shell looks in the current directory unless you specify another directory. For example,nano is an easy-to-use terminal text editor. The command nano document1 tells nano to launch and open the file named document1 from the current directory. If you wanted to open a document located in another directory, you’d need to specify the full path to the file – for example, nano /home/chris/Documents/document1 .
If you specify a path to a file that does not exist, nano (and many other programs) will create a new, blank file at that location and open it.
To work with files and directories, you will need to know a few basic commands:
  • cd – That ~ to the left of the prompt represents your home directory (that’s /home/you), which is the terminal’s default directory. To change to another directory, you can use the cd command. For example cd / would change to the root directory, cd Downloads would change to the Downloads directory inside the current directory (so this only opens your Downloads directory if the terminal is in your home directory), cd /home/you/Downloads would change to your Downloads directory from anywhere in the system, cd ~ would change to your home directory, and cd .. would go up a directory.
  • ls – The ls command lists the files in the current directory.
  • mkdir – The mkdir command makes a new directory. mkdir example would create a new directory named example in the current directory, while mkdir /home/you/Downloads/test would create a new directory named test in your Downloads directory.
  • rm – The rm command removes a file. For example, rm example removes the file named example in the current directory and rm /home/you/Downloads/example removes the file named example in the Downloads directory.
  • cp – The cp command copies a file from one location to another. For example, cp example /home/you/Downloads copies the file named example in the current directory to /home/you/Downloads.
  • mv – The mv command moves a file from one location to another. It works exactly like the cp command above, but moves the file instead of creating a copy. mv can also be used to rename files. For example, mv original renamed moves a file named original in the current directory to a file named renamed in the current directory, effectively renaming it.
This may be a bit overwhelming at first, but these are the basic commands you need to master to effectively work with files in the terminal. Move around your file system with cd, view files in the current directory with ls, create directories with mkdir, and manage files with the rmcp, and mv commands.

Tab Completion

Tab completion is a very useful trick. While typing something – a command, file name, or some other types of arguments – you can press Tab to autocomplete what you’re typing. For example, if you type firef at the terminal and press Tab, firefox automatically appears. This saves you from having to type things exactly – you can press Tab and the shell will finish typing for you. This also works with folders, file names, and package names. For example, you can type sudo apt-get install pidg and press Tab to automatically complete pidgin.
In many cases, the shell won’t know what you’re trying to type because there are multiple matches. Press the Tab key a second time and you’ll see a list of possible matches. Continue typing a few more letters to narrow things down and press Tab again to continue.
For more tricks like this one, read Become a Linux Terminal Power User With These 8 Tricks.

Mastering the Terminal

At this point, you should hopefully feel a little bit more comfortable in the terminal and have a better understanding of how it works. To learn more about the terminal – and eventually master it – continue your journey with these articles:

Wednesday, March 6, 2013

How to Fake your Location in Google Chrome


Sometimes websites may request access to your location so that they can serve more relevant information. For instance, if you are looking for a gas station, a maps website may use your current geographic location to display stations that are near your place.
Share Location in Chrome
Google Chrome will only share your location if you click Allow.

How Browsers Determine your Location

Earlier, websites would use the IP address to determine your approximate location but with the HTML5 Geolocation API, web browsers can more accurately detect your location using data from GPS, Wi-Fi networks, cell towers, Bluetooth and the computer’s IP address. If you agree to share your location, the browser will send these details to Google Location Services for estimating your location which is then shared with the requesting website.
To give you an example, open the Where am I app in your browser, allow it to use your location information and the app should be able to display your latitude and longitude coordinates (it is more accurate on mobile browsers as those devices have built-in GPS).

Fake your Geolocation Coordinates

When you happen to visit a location-aware website, the browser will always ask for a confirmation before sharing your location. If you aren’t keen to share your geographic coordinates, you can always deny that request or, if you are using Google Chrome, you can even send a fake location to the website.
Here’s how. Press F12 (or Ctrl + Shift + I) in Google Chrome to open the Developer Tools. Click the Settings icon in the lower right corner and switch to the Overrides tab (see the next screenshot). Now you can specify the exact latitude and longitude coordinates* that you want to share with that website.
[*] You can use the Postal Address finder to know the latitude and location of a place.
Make sure that the “Override Geolocation” setting is checked and then refresh the page to send that fake location. And this is obviously a useful feature for web developers who would like to test their geolocation-enabled apps from the same location.
Override Geolocation in Chrome

Use Hushed To Create Disposable Phone Numbers In 40 Countries


disposable phone numberThere are many situations in life where you need someone to be able to contact you reliably, but do not want them to permanently have your phone number. Consider these situations: dating or selling goods online. Both of these circumstances are great examples of why a throw-away phone number might be a good idea.
However, it can often be difficult to obtain a reliable disposable phone number outside of the US. But things are changing with the use of smartphones. Hushed is an application that will allow you to set up a throw-away phone number and delete it whenever you like. You can also manage multiple disposable numbers at once using the Hushed app.

Why Use A Disposable Phone Number?

As well as the obvious safety reasons with giving a disposable phone number to people you are dating and online contacts for buying or selling goods, there are a number of other good reasons to use a disposable number. Namely, a disposable number can be used as a redirect, giving cheaper calls to the person calling.
disposable phone number
If you are an expat or traveling around the world, you can easily set up a phone number for folks back home or for the locals you meet while traveling. When they call the number it will be a local call for them, but will be received by your phone. You could also use a number such as this to stay in contact with people who live in the same country, but far enough away to incur long-distance phone charges. Why not keep the costs down for everyone?
Disposable phone numbers may also be useful for children and teenagers as you can terminate the number if need be. Great for your peace of mind as a parent!
Using a disposable number via an application also opens up the possibility of using your Android tablet as a phone. This could be very useful for you or a family member – especially kids.

Get The Hushed App

The Hushed application for managing disposable numbers is available for free from the Google Play store (or the iOS App Store). However, it will cost you to obtain a number and to make calls using that number.
disposable phone number free

Hushed Phone Number Features

All Hushed numbers come with a voicemail box, so you can separate your voicemail from your regular calls. This is a fantastic tool if you have sold an item online, yet continue to get calls about it. Simply change your listing to say the item is sold and that you won’t be replying to messages any more. Then delete the number or just ignore the voicemail messages.
disposable phone number free
When you are finished with a phone number, you can delete it whenever you like. So, you can set up a number just for dating purposes and keep it working until the day you wish you’d never given out the number to a certain person. Then you can simply delete it and create a new phone number.
Hushed phone numbers work in 40 countries worldwide, so it’s very handy for traveling. This also opens up the possibility of disposable numbers to people in countries who may have previously found it difficult to obtain one.

Using Hushed Phone Numbers

To get a Hushed phone number, you need to pay a minimum of US $1.99 to set it up. You choose your number, a price and an expiry date, with a choice of 7, 30 or 90 days maximum. As mentioned previously, you can delete your number at any time you like in advance of your expiry date. You can also choose to automatically extend a number when it reaches its expiry date.
disposable phone number
Hushed phone numbers can also be used to make outbound phone calls and to send/receive text messages. To facilitate this, Hushed works similarly to a prepaid phone card. You can add money to Hushed and keep track of your call costs as you make them. This keeps your costs as transparent as possible.

Alternatives to Hushed

Obviously, the best alternative to an application like Hushed is to use Google Voice (if you are in the US), a VoIP provider or any voice/video chat service such as Skype or Google Hangouts. If you are an iOS user, there is also a similar application called Burner. The chat services may not have quite the same level of anonymity, but you can block people and remove them from your friends list when you are finished requiring contact with the person. They also work extremely well for cutting your long-distance call costs.
What service do you use to create disposable phone numbers? Why?

Jailbreak iOS 6.1.2 Untethered On All iDevices


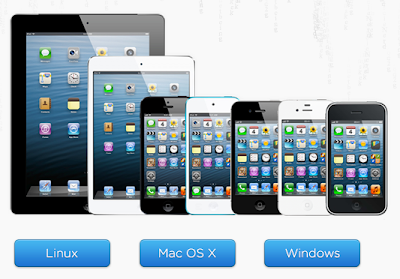
Apple has been quick to patch the last of the bugs found in the iOS 6.1.1. With the release of iOS 6.1.2 it seemed that Apple would patch the jailbreak exploit as well. Fortunately, they haven't. The developers of the jailbreak tool Evasi0n are on a roll as they have updated the software to support iOS 6.1.2. Evasi0n v1.4 can now untether jailbreak iOS 6.1.2.


Note: This Jailbreak tool is available for all the iDevices mentioned below:
  • iPhone 5
  • iPhone 4S
  • iPhone 4
  • iPhone 3GS
  • iPad 4
  • iPad 3
  • iPad 2
  • iPad mini
  • iPod touch 4
  • iPod touch 5
Its supported firmwares are:
  • iOS 6.0
  • iOS 6.0.1
  • iOS 6.0.2
  • iOS 6.1
  • iOS 6.1.1
  • iOS 6.1.2

Evasi0n tool supports all iDevices except Apple TV 3 and it is recommended that you backup your device using iTunes or iCloud before proceeding.

All the steps are exactly the same as before. Nothing has changed. If you haven't read up on the topic, we would suggest you look into a full tutorial.

Please read the instructions below and follow them to the dot:

1. Update your iDevice to iOS 6.1.2 via iTunes restore. Click here to download iOS 6.1.2 and update your iDevice manually.

2. Download Evasi0n Jailbreak Tool v1.4 on your Windows, Mac or Linux. (Download links provided below).

3. Disable password lock in case you have enabled it on your iDevice. To do so, go to Settings --> General --> Passcode Lock, and then just switch it off.

4. Run Evasi0n on your computer to get started.


5. Connect your iDevice to your computer via data cable and make sure that your computer recognises it.

6. Hit the jailbreak option and wait for the software to complete performing necessary steps to jailbreak your device. Do not touch your device or your computer during this time.


7. Once done, your iDevice will boot back up. When it does, unlock your device, and click on the icon which will now be available on your homescreen named "jailbreak". Click on it and wait.


8. After rebooting a couple of times, you will then have access to Cydia on your homescreen. This means that you have successfully jailbroken your iGadget. Congratulations!


Download Evasi0n Jailbreak Tool v1.4


Cheers!

About the Author: